
Overview

Meta Catalog Sales campaigns dynamically show products from your catalog to users based on their browsing and purchase behavior — for example, retargeting someone who viewed a product but didn’t buy. For these campaigns to work, Meta needs real-time signals about how users interact with your products. By sending ecommerce events (purchases, add to cart, content views) through Linkrunner, you feed Meta the data it needs to match users to the right products and optimize your ad spend. Linkrunner seamlessly syncs these events with your connected Meta dataset.
Before you begin, make sure you have:
  • A product catalog set up in Meta Commerce Manager
  • Meta Ads integration configured in Linkrunner (see Meta Ads setup)
  • Events integrated in your app via the Linkrunner SDK or API

Step 1: Select Catalogue Products

To begin, you need to select your catalogue products within the Meta Commerce Manager. Ensure your product feed is active and products are properly categorized. Select your catalogue products Make sure to add products with the correct 
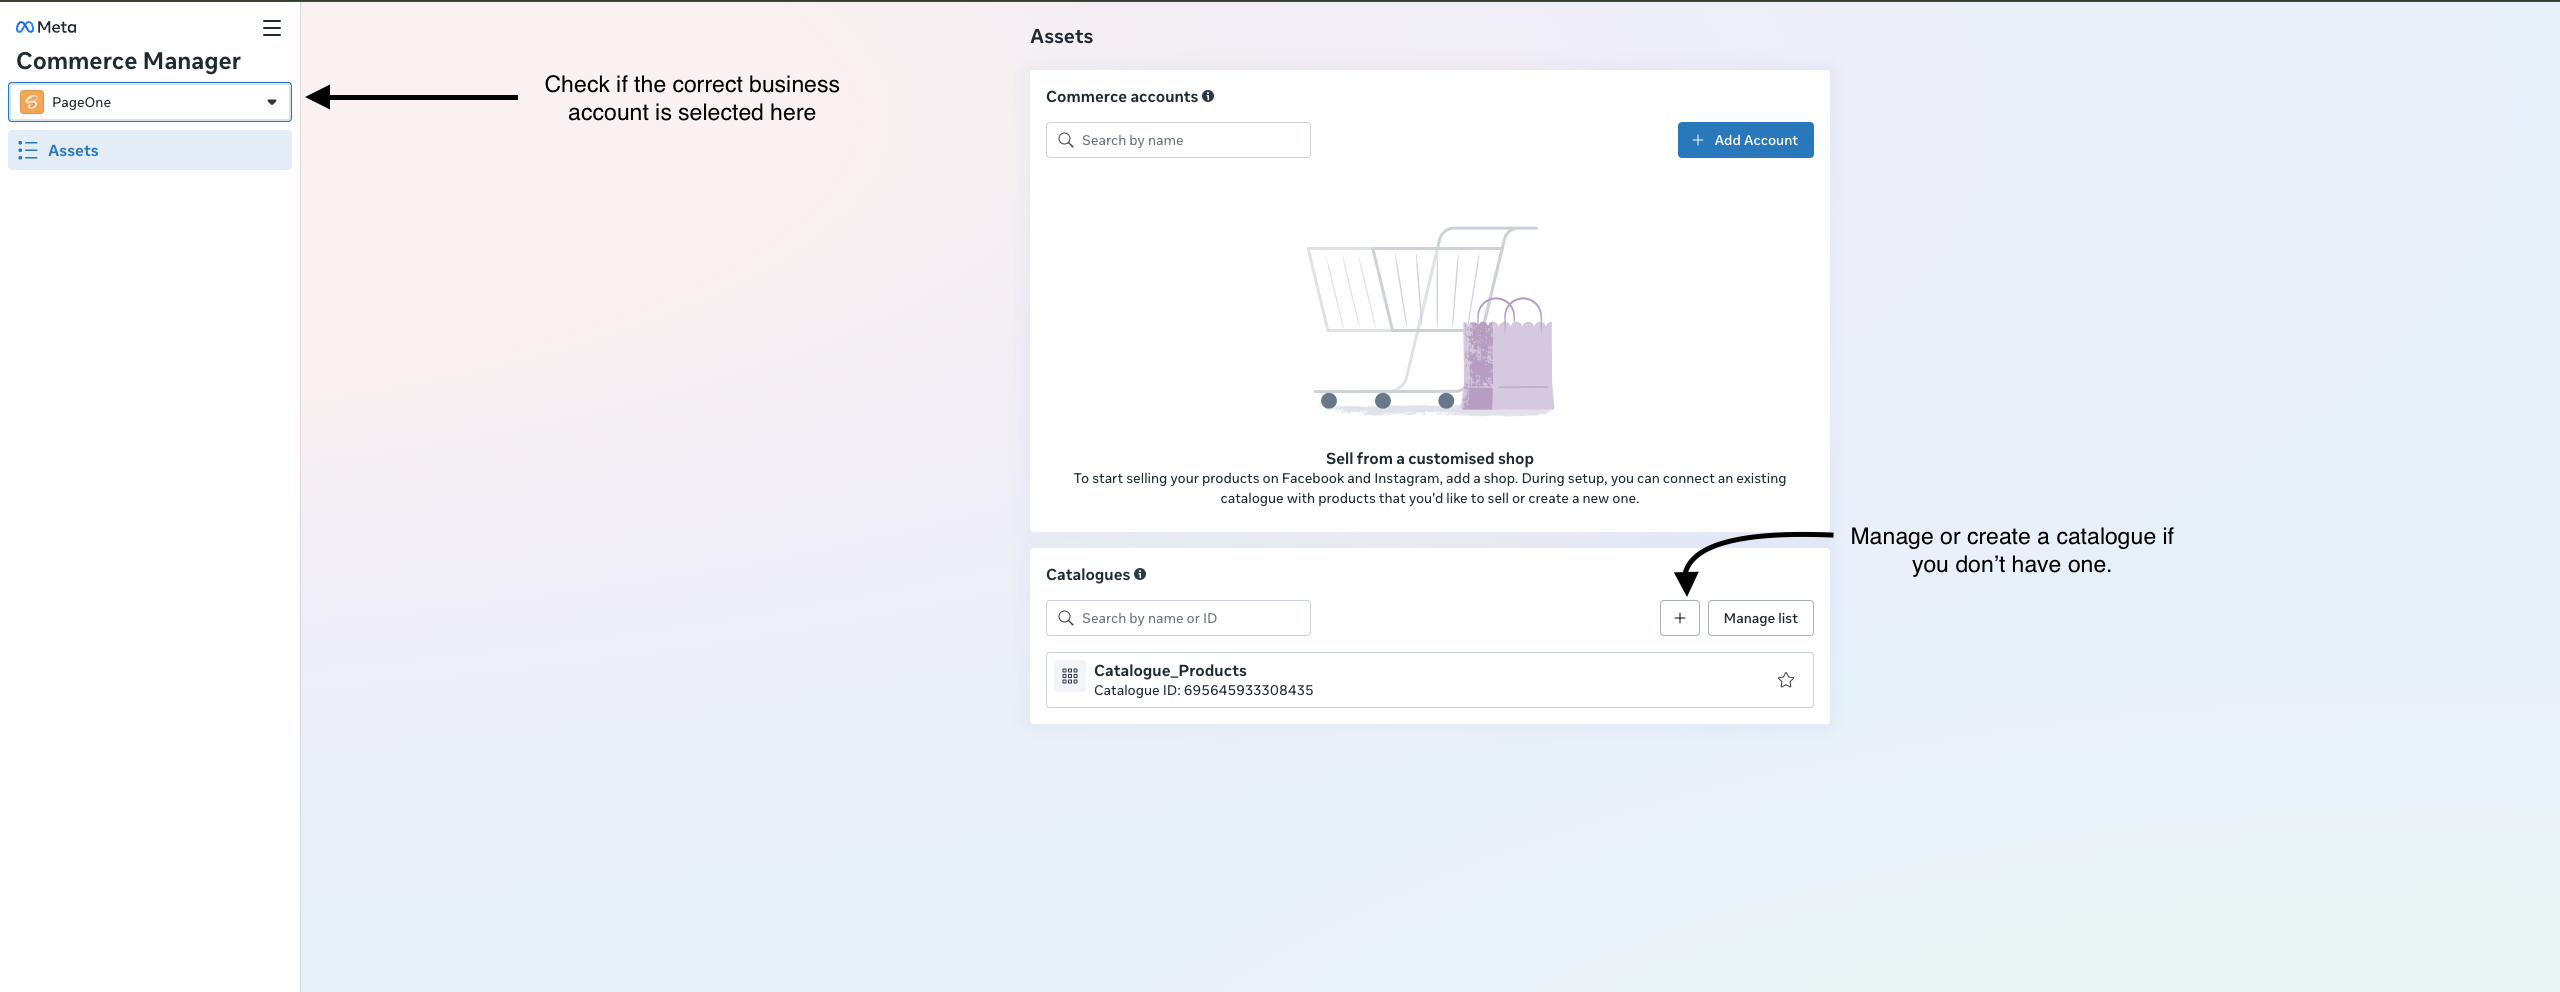
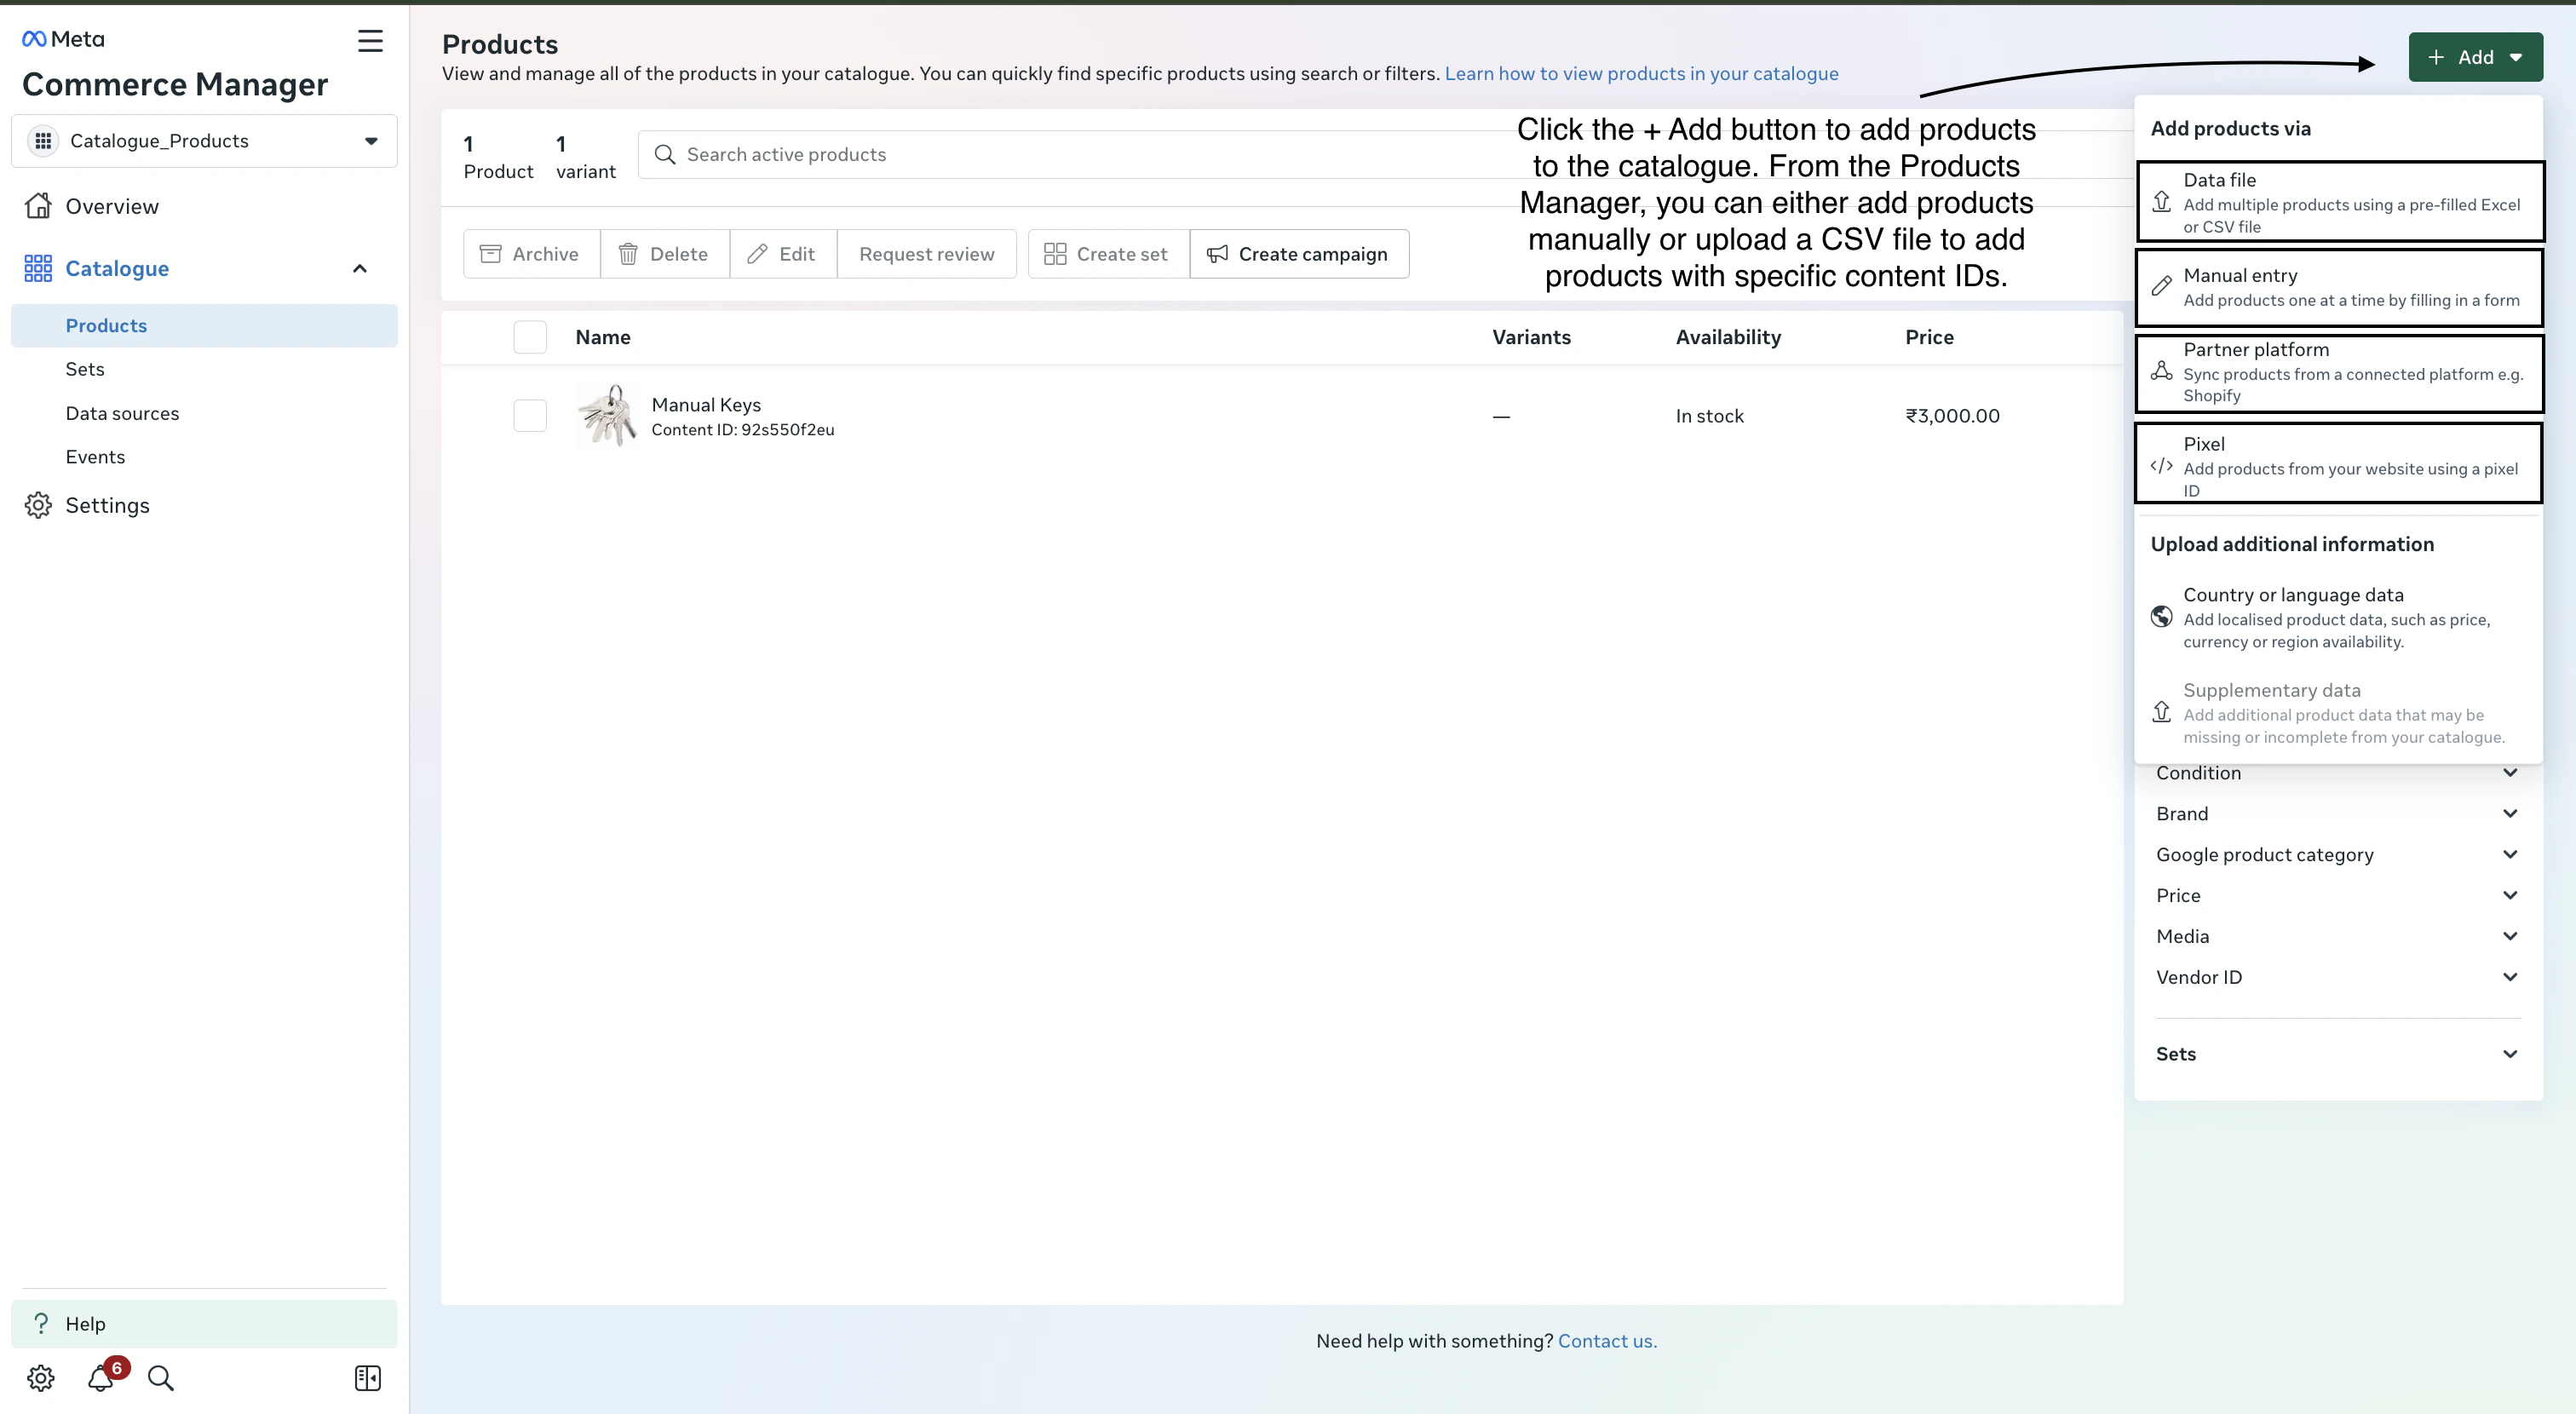
content_ids and item_group_ids. There are various ways to add products — for example, manually or via CSV upload. Click the + Add button to add products to the catalogue. From the Products Manager, you can either add products manually or upload a CSV file to add products with specific content IDs. Add products to catalogue via manual entry or CSV upload
Make sure that whenever you add a product to the Meta catalogue, it includes a content ID. This content ID should match the product ID on your side, and it must be the same ID you send through the Linkrunner SDK.When uploading products via CSV, use the item_group_id column to assign group IDs to your products. This is how Meta groups product variants together ensure these match the item_group_ids you send in your events.
The screenshot below shows exactly where to add the content ID when adding or uploading a product to your Meta catalogue: Where to add content ID when uploading products to Meta catalogue Each product in your catalog has a Content ID and an Item group ID. These are the values you’ll use in the 
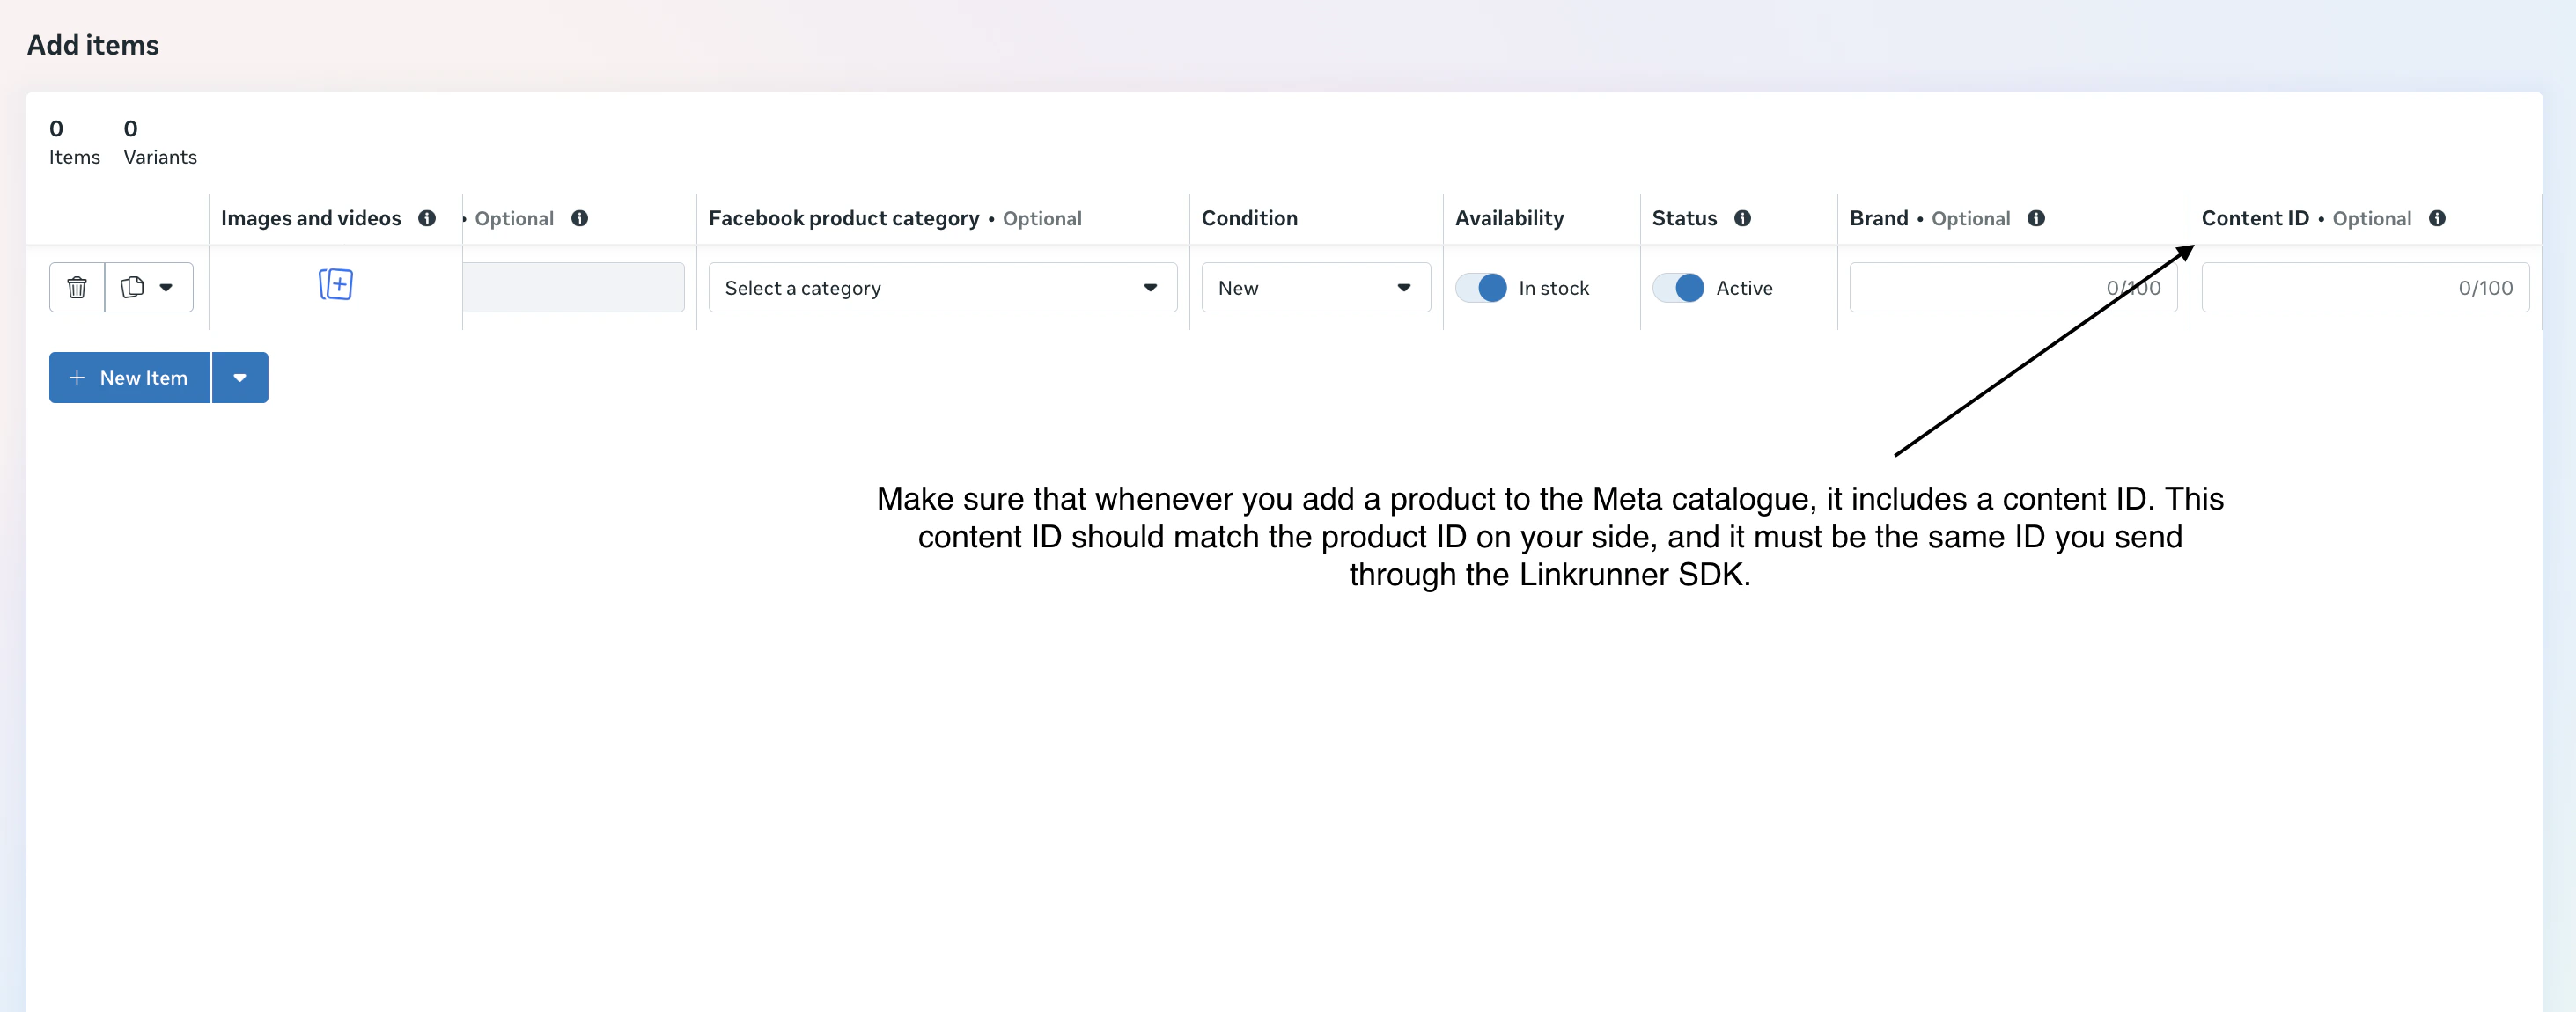
content_ids or item_group_ids fields when sending events — they’re how Meta matches your events back to the correct catalog products. Content ID and Item group ID fields in Commerce Manager

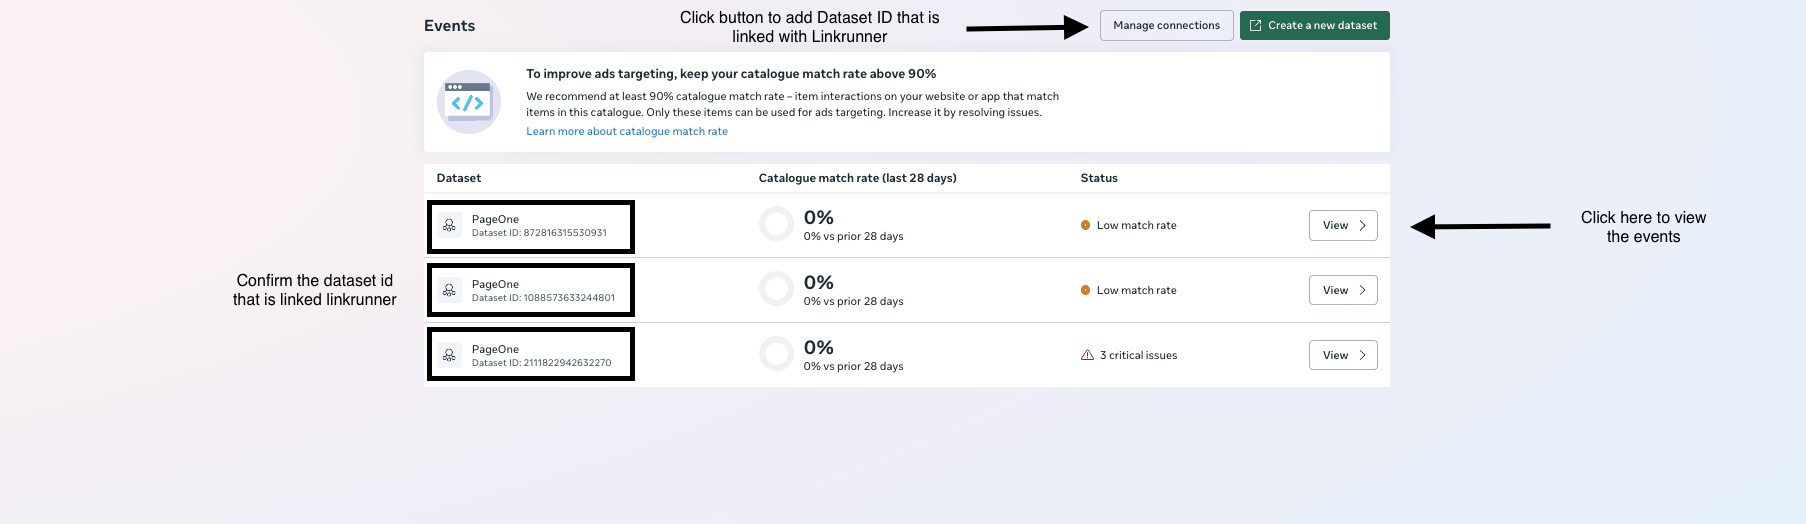
Step 2: Verify Dataset ID Connection

Once your catalogue is set up, navigate to the events section. Check if the Dataset ID connected with Linkrunner is present and active. If the Dataset ID is not linked:
  1. Press on Manage Connections.
  2. Find the Dataset ID that is linked with Linkrunner.
  3. Turn the connection ON.
Make sure the linking part is successfully completed before proceeding. Manage connections and turn on Dataset ID

Step 3: Required Events

View the dataset ID and check the events list. There are 3 essential events we actually need to send: Note: Any event you want to send for these actions should be mapped with their respective standard commerce manager events in the Linkrunner Dashboard. For example, map your custom add to cart event (e.g., add_to_cart) with AddToCart, your view event (e.g., item_viewed or view_content) with ViewContent, and your payment event (e.g., FIRST_PAYMENT or DEFAULT) with Purchase. Make sure you have integrated the appropriate APIs in your application to send these events. View Dataset ID Events The Catalogue match rate shown in Commerce Manager measures the percentage of product IDs in your events that successfully match products in your catalog. Meta recommends maintaining a match rate of 90% or higher for optimal ad targeting and delivery. If your match rate is low, double-check that the 
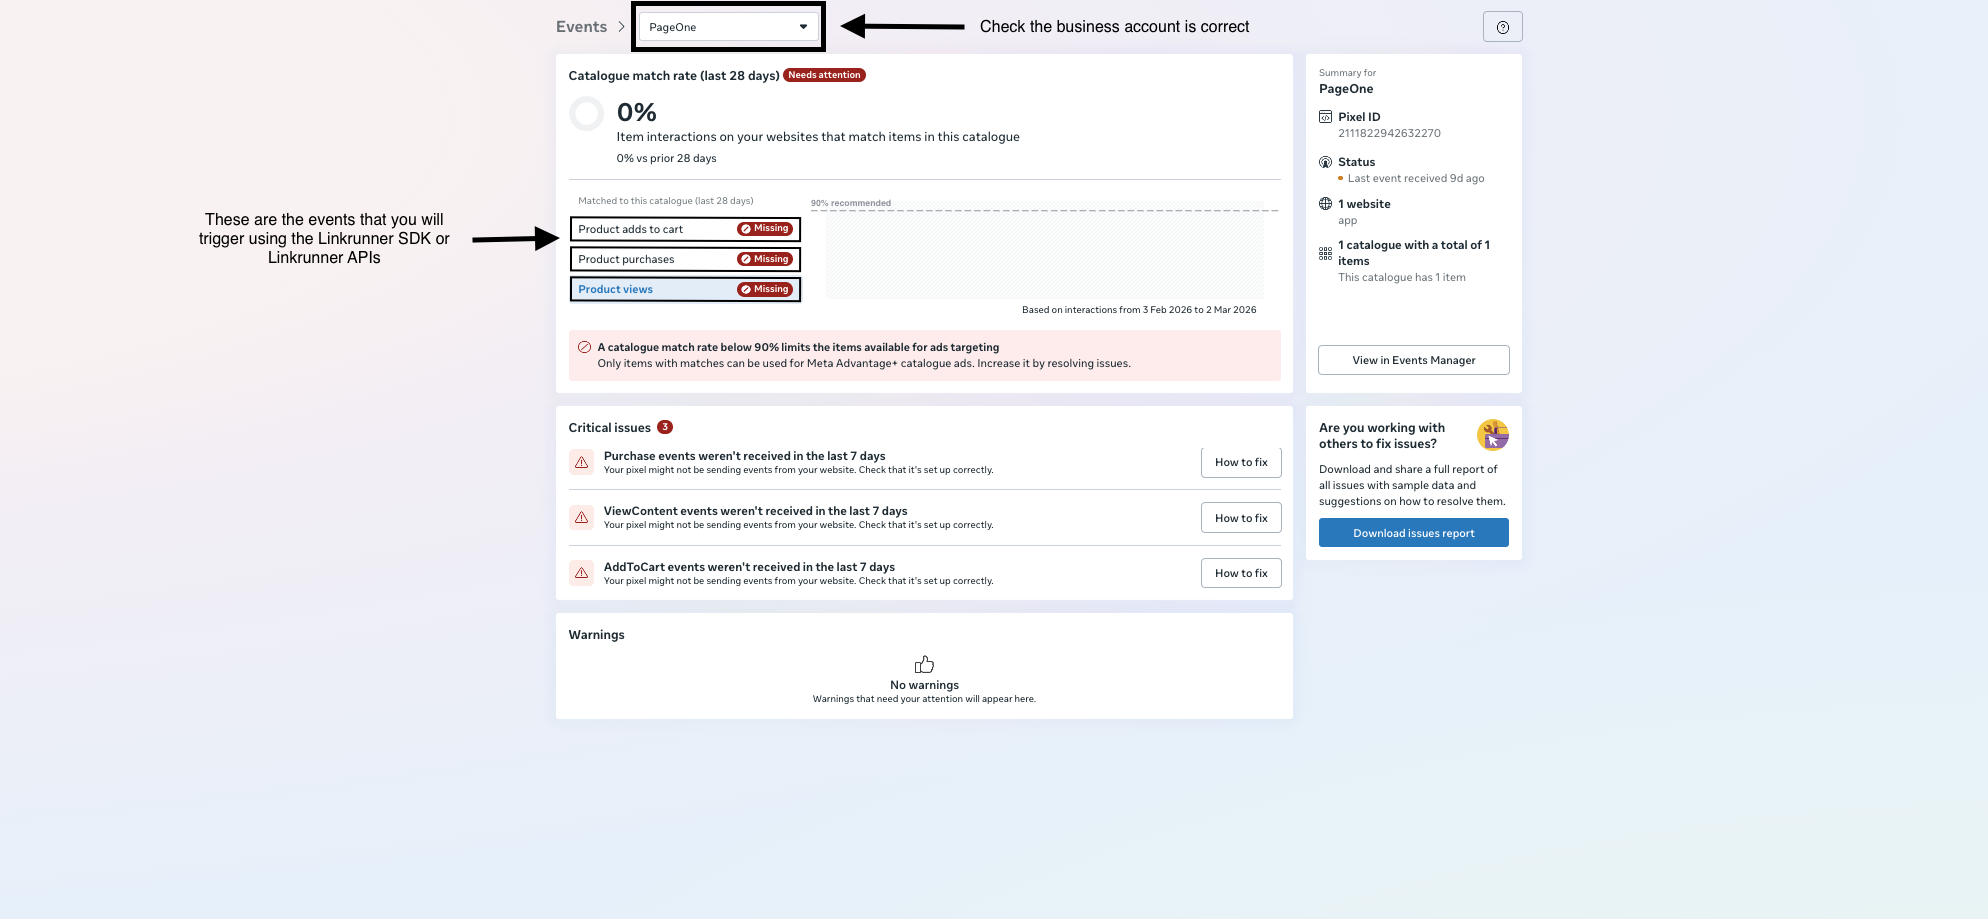
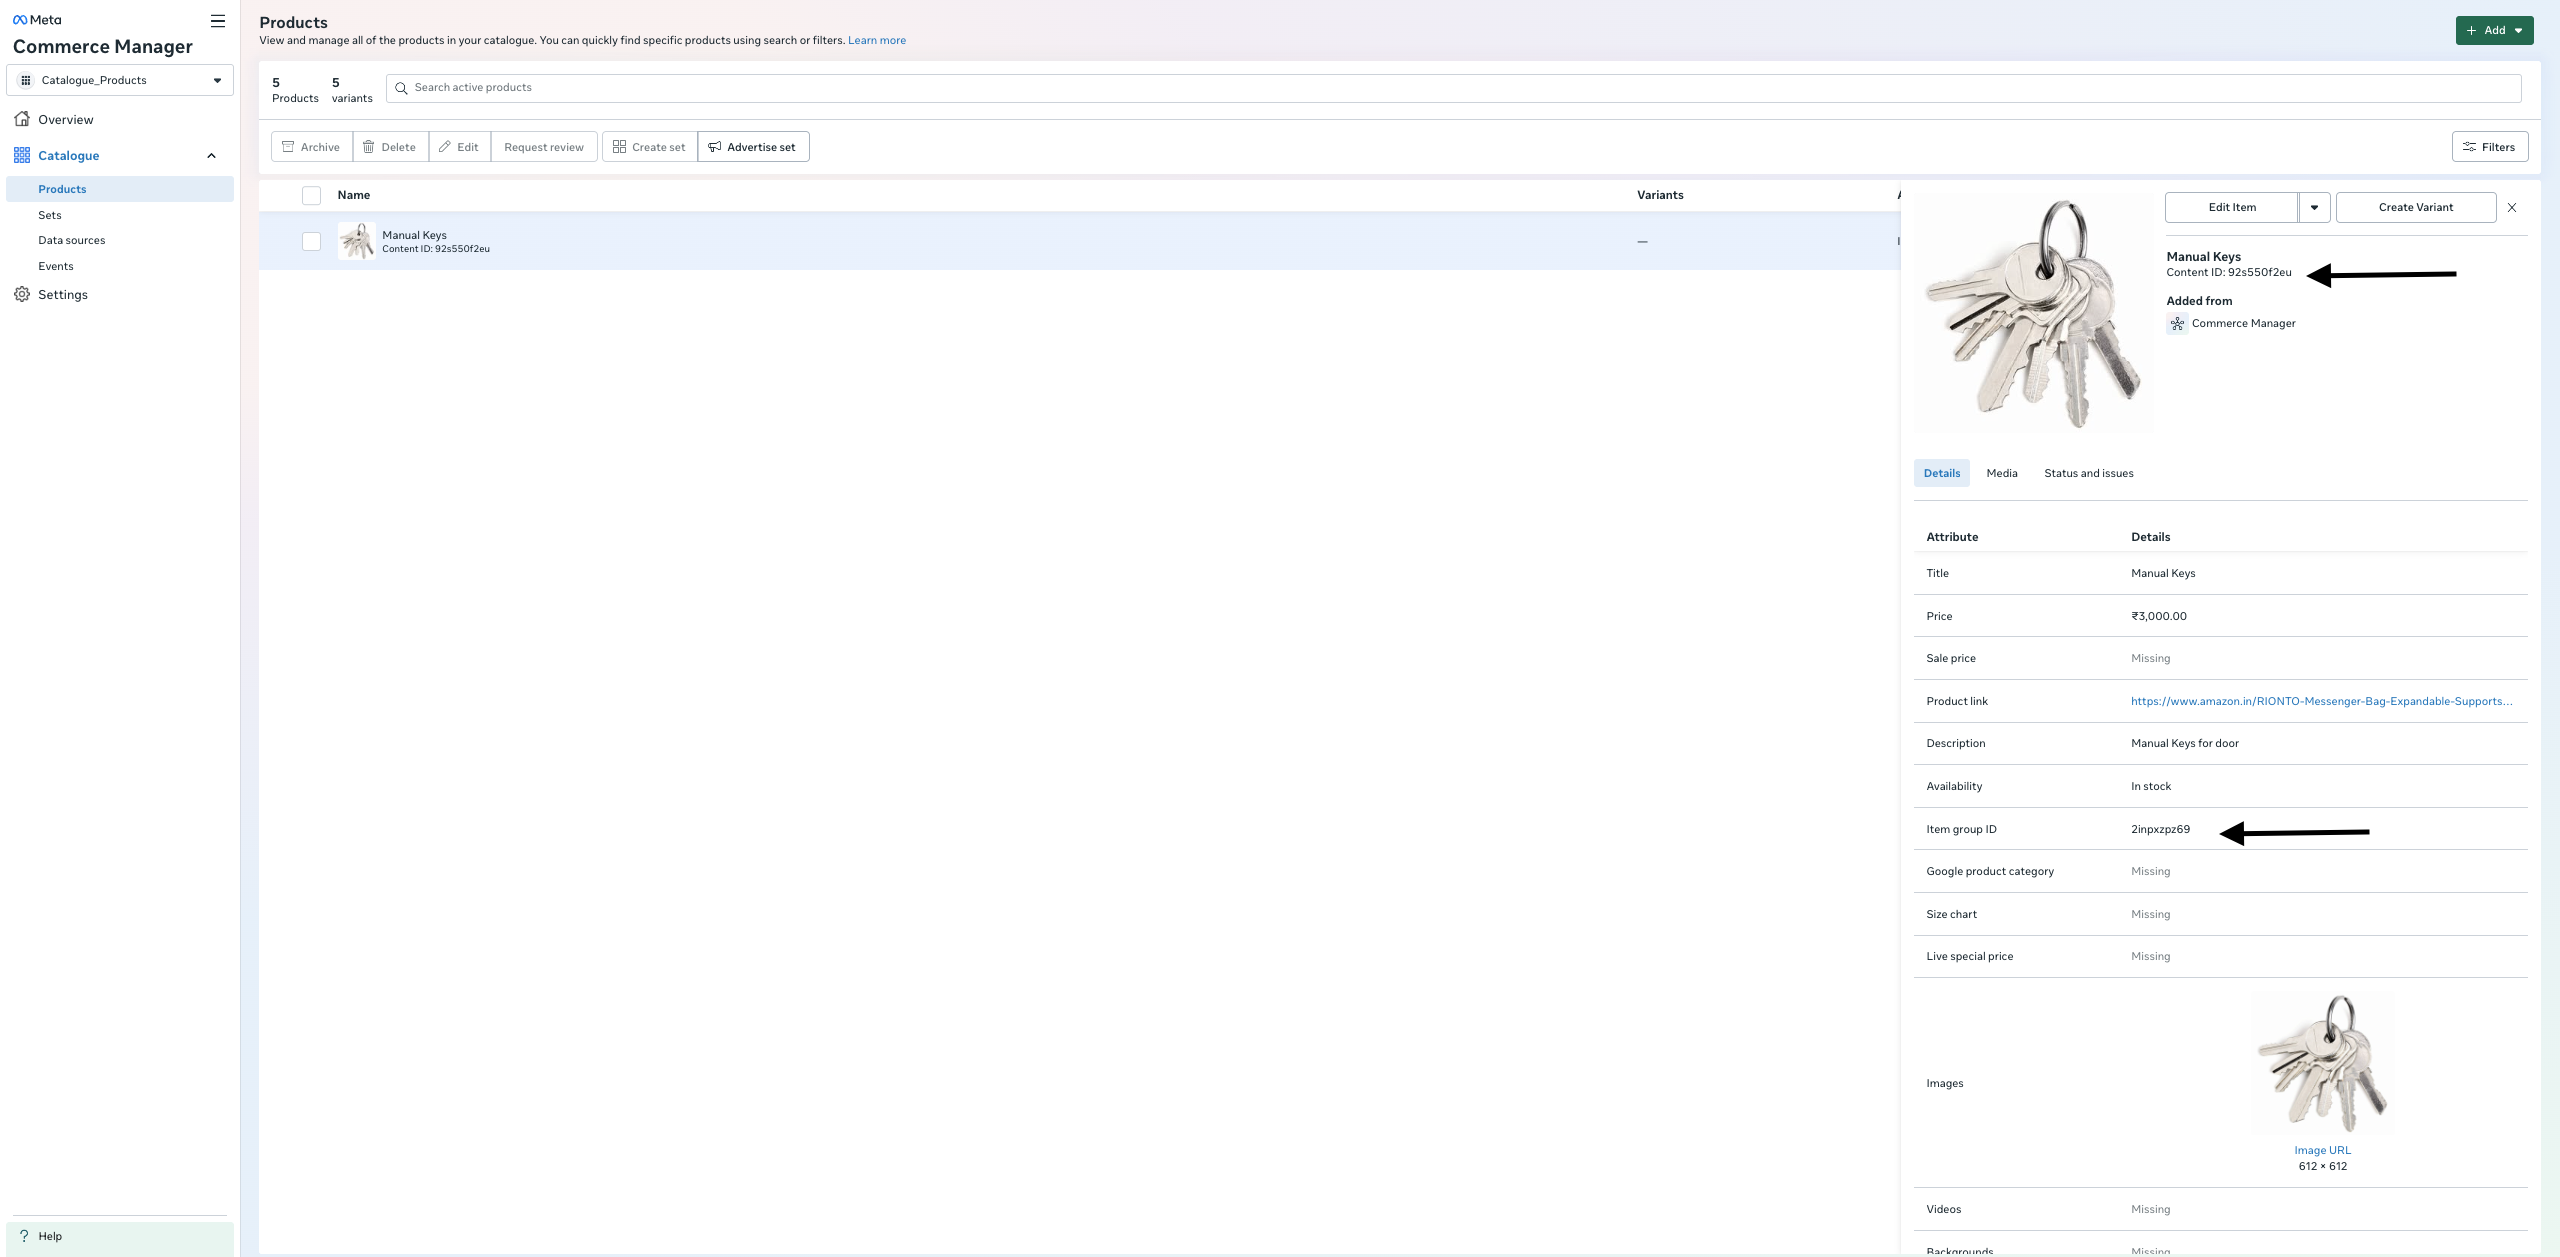
content_ids or item_group_ids in your events exactly match the IDs in your catalog.

Understanding event_data

When sending events via the Capture Event API or Capture Payment API, you must include specific fields in your event_data payload for Meta to correctly attribute and optimize your catalogue sales.

Required Fields for Ecommerce Events

ParameterTypeDescription
content_ids / item_group_idsarrayRequired for Purchase, AddToCart, ViewContent.
content_ids: Use an array of single product IDs for variants. Example: ['id1', 'id2'].
item_group_ids: Use for full product groups to boost the entire group.
contentsarray of objectsRequired for Purchase, AddToCart, ViewContent.
Array detailing items included:
id: Matches content_ids / item_group_ids.
quantity: Number of items.
item_price: Unit price (must match Meta Products catalog).
content_typestringRequired for Purchase, AddToCart, ViewContent.
Set to "product" for content_ids, or "product_group" for item_group_ids.
valuenumberRequired for Purchase, AddToCart.
Total numeric value (e.g., item_price * quantity). No currency symbols.
currencystringRequired when value is sent.
The 3-letter ISO currency code (e.g., "USD", "INR").
num_itemsnumberRequired for Purchase, AddToCart.
Total quantity of items in the contents array.
order_idstringRequired for Purchase.
Backend-generated unique purchase order ID.
The item_price in the contents array should match the product price in your Meta catalog. Mismatched prices can lower your catalogue match rate and affect ad optimization.
Example 1: Using content_ids (individual product variants) Use content_ids when you want to target specific product variants (e.g., a particular size or color). Set content_type to "product".
"event_data": {
    // Use content_ids for individual product variants.
    // These IDs must exactly match the Content ID in your Meta catalogue.
    // For example, "sku_blue_tshirt_m" is the Content ID of a medium blue t-shirt
    // and "sku_black_jeans_32" is the Content ID of size-32 black jeans.
    "content_ids": [
        "sku_blue_tshirt_m",
        "sku_black_jeans_32"
    ],

    // Each entry in contents must have an "id" that matches one of the content_ids above.
    // "quantity" is how many units the user interacted with.
    // "item_price" is the unit price — this should match the price in your Meta catalogue.
    "contents": [
        {
            "id": "sku_blue_tshirt_m",
            "quantity": 1,
            "item_price": 799
        },
        {
            "id": "sku_black_jeans_32",
            "quantity": 1,
            "item_price": 1499
        }
    ],

    // Set to "product" when using content_ids (individual variants).
    "content_type": "product",

    // ISO 4217 currency code.
    "currency": "INR",

    // Total value = sum of (item_price * quantity) for all items.
    // 799 * 1 + 1499 * 1 = 2298
    "value": 2298.00,

    // Total number of items across all entries in contents.
    "num_items": 2,

    // Unique order ID from your backend (required for Purchase events).
    "order_id": "order_98765"
}
Example 2: Using item_group_ids (product groups) Use item_group_ids when you want to boost an entire product group rather than a specific variant. For example, if a user views “Blue T-Shirt” (which comes in S, M, L), you send the group ID so Meta can optimize across all variants. Set content_type to "product_group".
"event_data": {
    // Use item_group_ids to target entire product groups.
    // "tshirt_blue" is the Item Group ID in your Meta catalogue that groups
    // all size variants (S, M, L, XL) of the blue t-shirt.
    // This must match the item_group_id column in your CSV upload
    // or the Item Group ID field in Commerce Manager.
    "item_group_ids": [
        "tshirt_blue"
    ],

    // When using item_group_ids, the "id" in contents should match the group ID.
    "contents": [
        {
            "id": "tshirt_blue",
            "quantity": 1,
            "item_price": 799
        }
    ],

    // Set to "product_group" when using item_group_ids.
    "content_type": "product_group",

    "currency": "INR",
    "value": 799.00,
    "num_items": 1,
    "order_id": "order_10234"
}
When to use which?
  • Use content_ids + content_type: "product" when you know the exact variant the user interacted with (e.g., they added “Blue T-Shirt Size M” to cart).
  • Use item_group_ids + content_type: "product_group" when you want Meta to optimize across all variants in a group (e.g., the user viewed the “Blue T-Shirt” product page without selecting a size).

Note: For full integration details and request examples, refer to the Capture Event API and Capture Payment API documentation.

Testing Ecommerce Events

After you have integrated the APIs and started sending events, you will naturally want to verify everything is working correctly.
  1. Send a Test Event: Trigger an event using the Capture Event API (e.g., add_to_cart) or the Capture Payment API (e.g., Purchase).
  2. Check the Meta Events Manager: Navigate to your Commerce Manager > Events section.
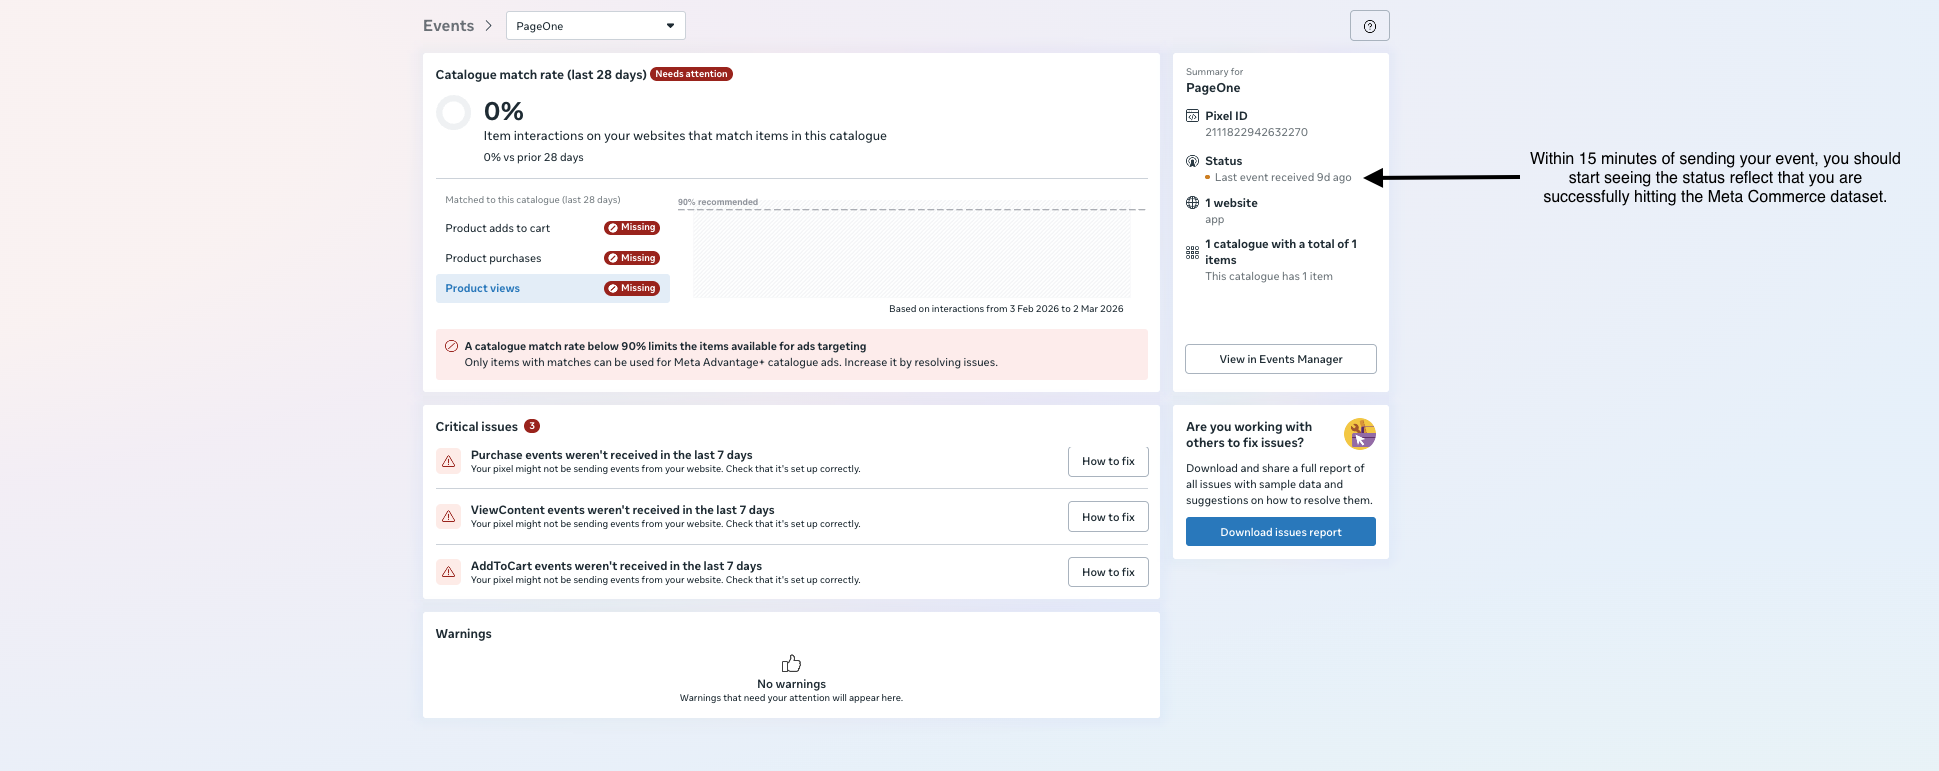
  3. Wait for Status Updates: Within 15 minutes of sending your event, you should start seeing the status reflect that you are successfully hitting the Meta Commerce dataset.
Commerce Manager Events Testing Verification Note: While the real-time hits will show up in Events Manager within 15 minutes, please be aware that it can take a few days for the actual data to fully reflect and populate across all Commerce Manager dashboards.

Creating a Catalog Sales Campaign

Once your events are flowing and your catalogue match rate is healthy, you can create a Catalog Sales campaign in Meta Ads Manager:
  1. Go to Meta Ads ManagerCreate Campaign → select the Sales objective and choose your catalog.
  2. Select the catalog that is connected to your Linkrunner dataset.
  3. Under ad set, choose your targeting strategy:
    • Broad audience — Meta finds new customers likely to purchase from your catalog.
    • Retargeting — target users who have already interacted with your products (e.g., viewed content or added to cart but didn’t purchase).
  4. Configure your budget, placements, and creative, then publish.
Retargeting audiences are automatically built from the ViewContent, AddToCart, and Purchase events you send through Linkrunner. The more event data Meta receives, the better it can optimize delivery.