

Before you start
Check where your checkout runs
Check where your checkout runs
checkout pages under yourstore.com) for the purchase to
be linked to the shopper’s browsing session.Most Shopify stores are already set up this way. If your checkout runs on
yourstore.myshopify.com while your storefront is on yourstore.com, Step 2 below
is required rather than optional.Get your Web project token
Get your Web project token
YOUR_WEB_SDK_TOKEN.Back up your theme
Back up your theme
Installation
Add the SDK to your theme
layout/theme.liquid.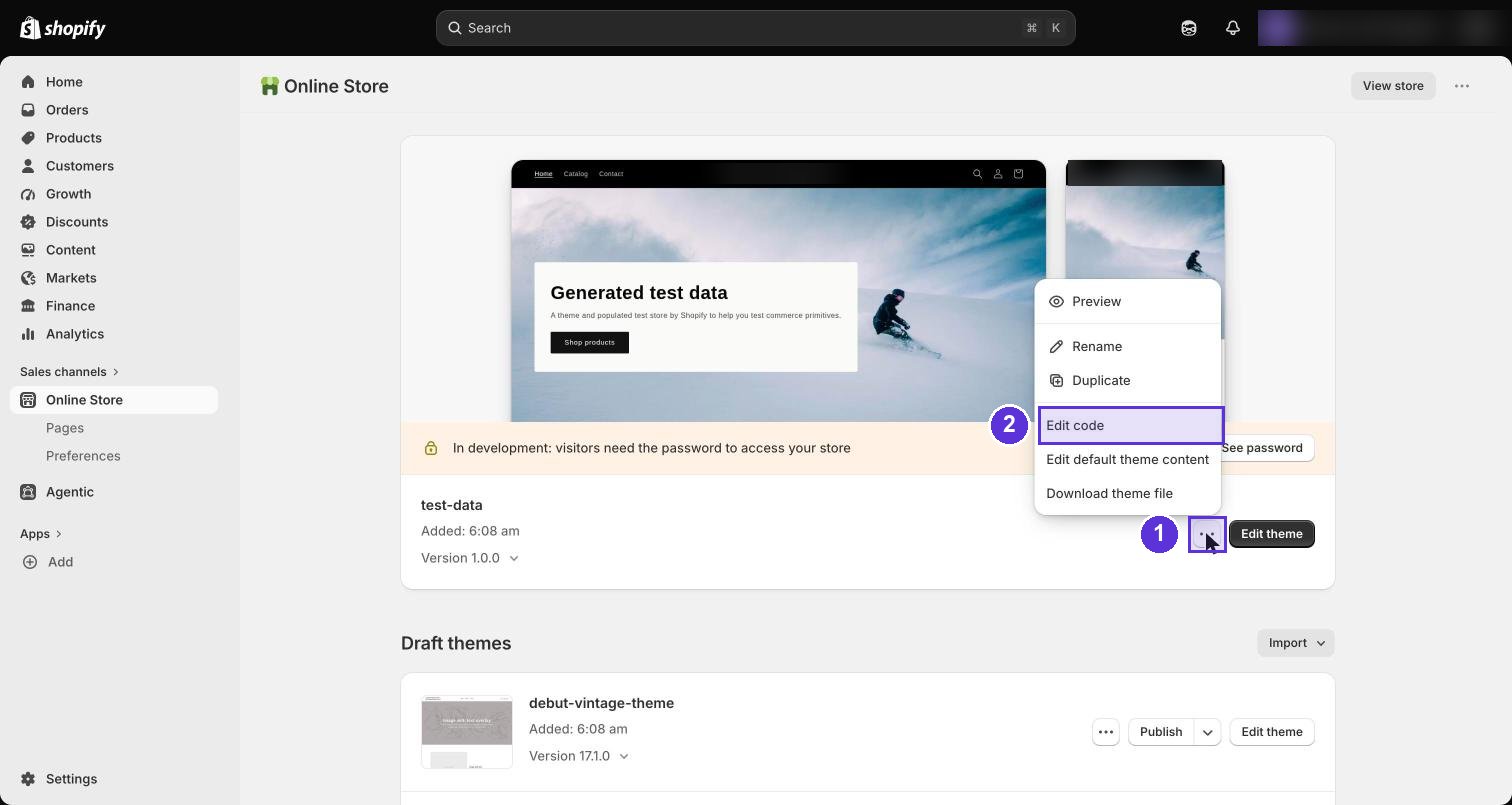
Open the ⋯ menu on your live theme (1), then choose Edit code (2)
</head> tag, replacing
YOUR_WEB_SDK_TOKEN:Pass the visitor ID into the cart
layout/theme.liquid file, paste this directly below the script you
just added:Track sign-ups
layout/theme.liquid file, paste this directly below the cart snippet:signup event with their name, email, and phone. Every later event from that
browser, including their purchases, carries the same user ID.Shopify signs customers in with a one-time email code and creates the account on
first use, so the first sign-in in each browser is recorded as the sign-up. The
Unique Users column in Web Events counts each customer once, even if they sign
in on several devices.Add the checkout pixel
Linkrunner.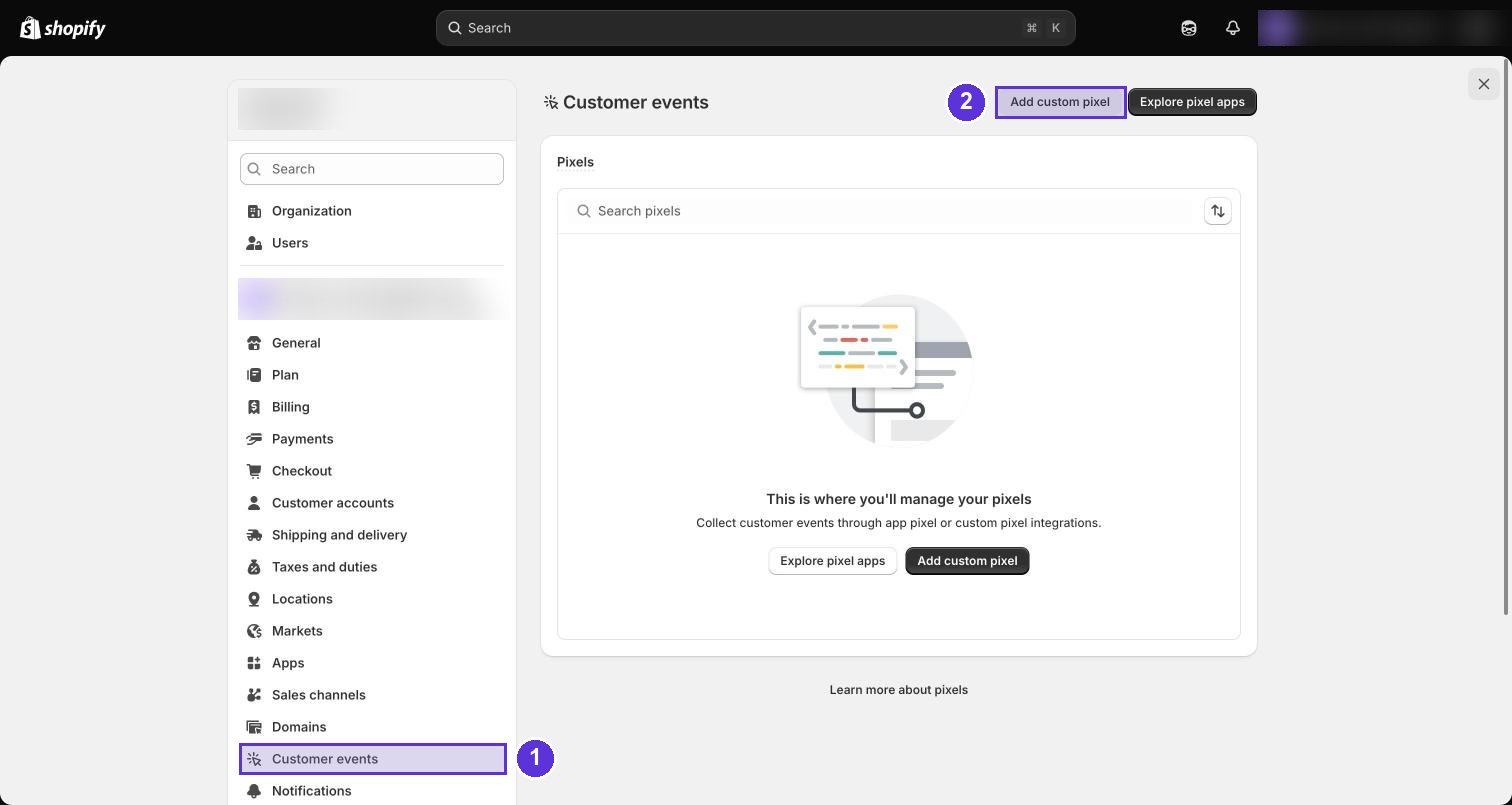
Settings → Customer events (1), then Add custom pixel (2)
// Step 1. Initialize the JavaScript pixel SDK. Select all of it and delete it, then
paste the code below and replace YOUR_WEB_SDK_TOKEN with the token you used in
Step 1.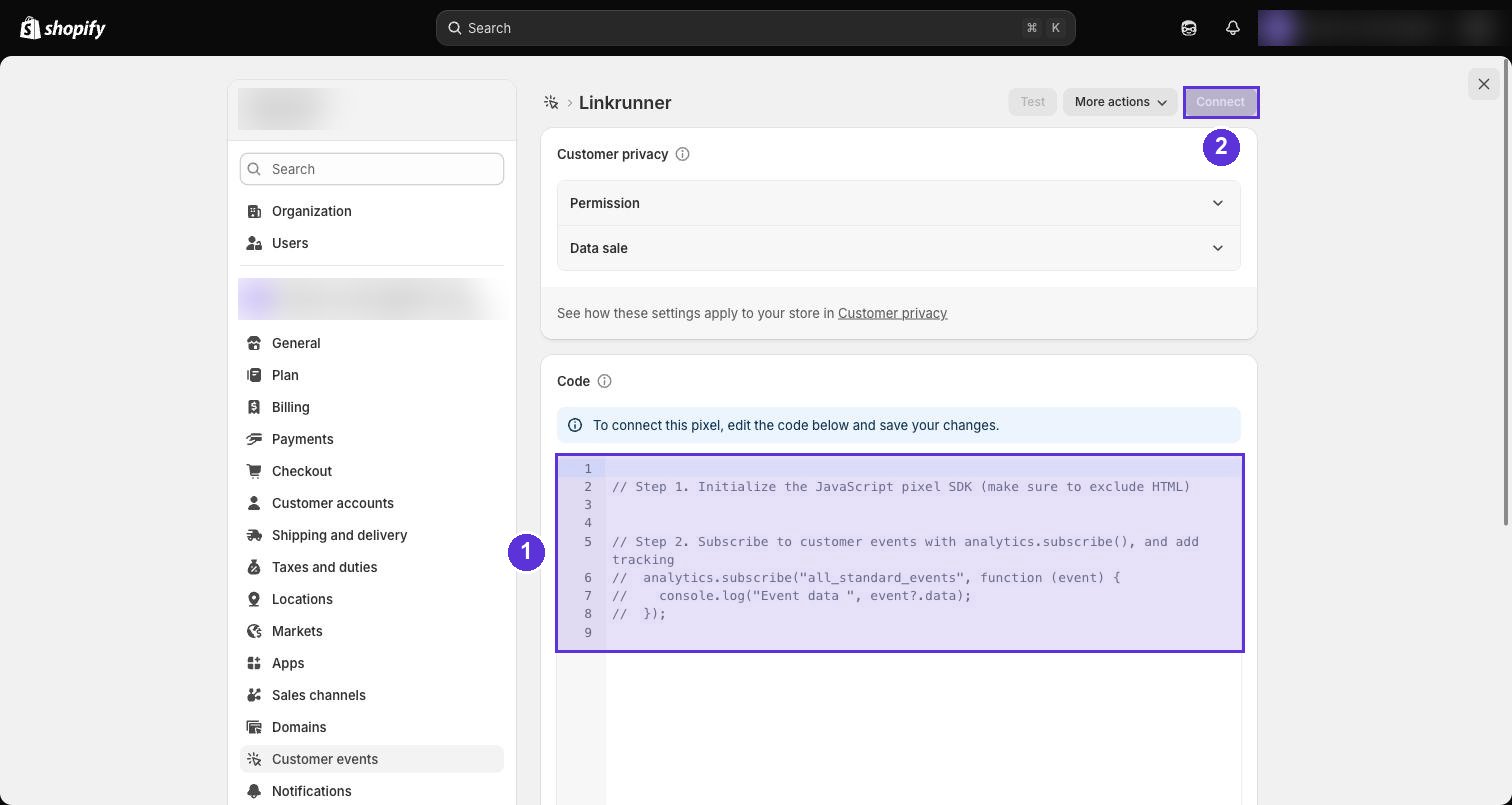
Replace the placeholder in the Code box (1). Connect (2) is the button you press after saving.
catch at the end is deliberate. A custom pixel must never throw, because
an error there can interrupt the checkout. Failures are swallowed silently, which is
why you verify with the steps below rather than by watching for errors.- Permission: leave Required selected, with Marketing and Analytics ticked. Analytics covers page views and sessions; Marketing covers the ad click IDs and campaign data that attribution depends on. Preferences is unused, leave it unticked.
- Data sale: leave Data collected qualifies as data sale selected. The pixel then stops collecting for shoppers who opt out of having their data sold.
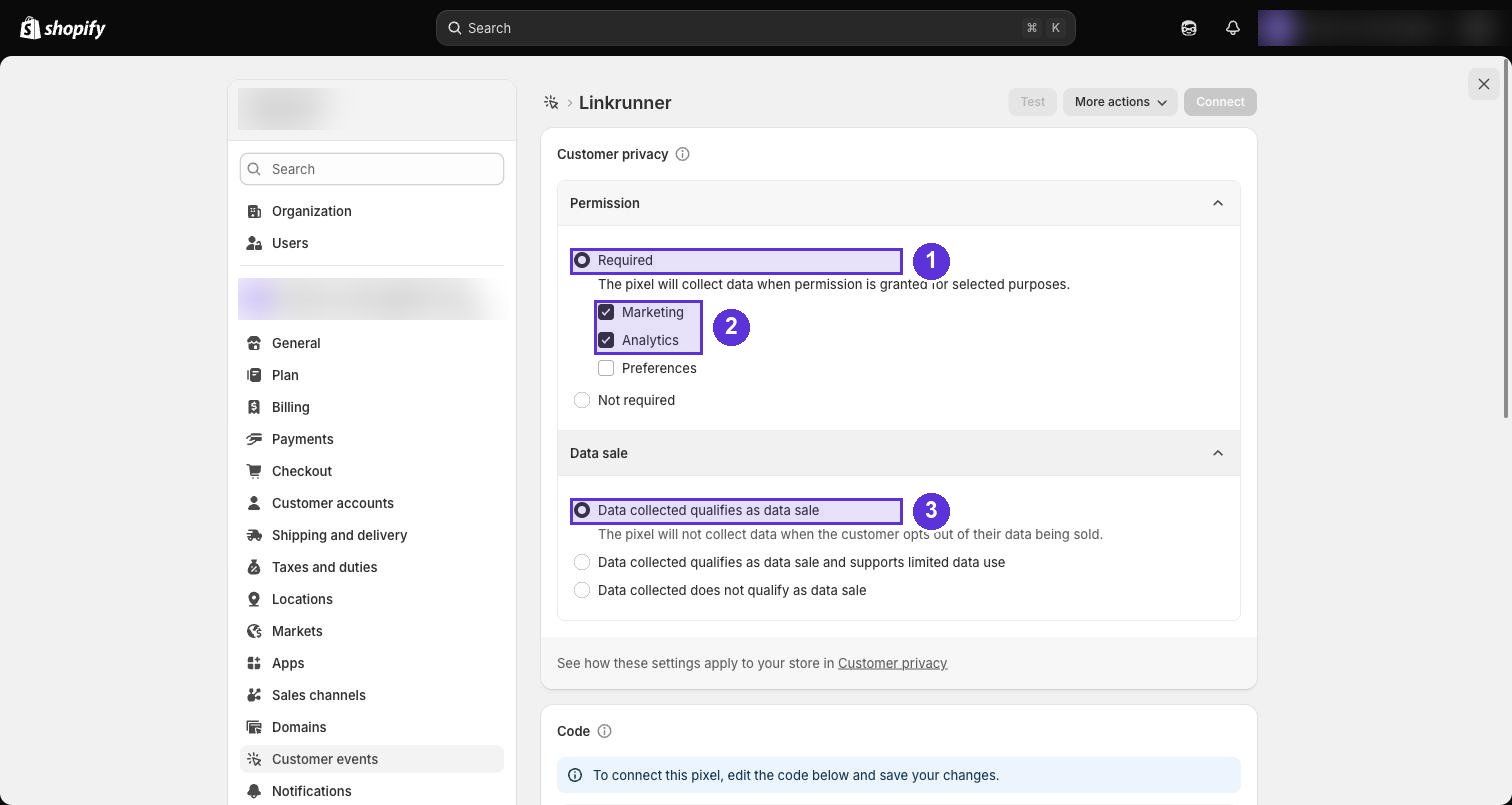
Leave Required selected (1) with Marketing and Analytics ticked (2), and leave the default Data sale option (3)
Verify it works
- Open a private browser window and visit your store with test campaign parameters,
for example
https://yourstore.com/?utm_source=meta&utm_medium=cpc&utm_campaign=test - Sign in to a customer account on your store
- Browse a product, add it to the cart, and complete a real order
- Open Web Events in your Linkrunner dashboard
purchase event carrying
the order value, all attributed to utm_campaign=test.For a guided check from your own browser, follow Test the Web SDK.Function Placement Guide
Shopify uses the Web SDK: loading the script initializes it,identify sets the customer user ID, and track('signup', ...) records signup. Incoming URL attribution is automatic; there is no handleDeeplink method.
Track custom events
Uselr.track to record other actions on your storefront, such as clicks on a button or
link. Paste the code in layout/theme.liquid, below the snippets from the steps above.
This example records a catalog_click event each time a shopper clicks a link to your
catalog:
href. To track another element, add another if block
inside the same listener with its own event name:
signup or purchase as custom event names. Those names feed the Sign-ups
and Purchases columns.
To see an event in Web Events, click
the columns icon above the table, click Custom Event, select your event, and click
Save. The column shows how many times the event fired. If a new event isn’t in the list
yet, reload the page.
Collect from your own subdomain
Some ad blockers stop requests toapi.linkrunner.io. You can send events through a
subdomain of your store instead, such as lr.yourstore.com. The setup above works without
this.
Register the subdomain
lr.yourstore.com.Add the DNS record
api.linkrunner.io:Add the subdomain to your theme
layout/theme.liquid, add data-domain to the script tag from Step 1:Verify the subdomain
ingest. Requests
should go to https://lr.yourstore.com/web/ingest and return 204.If each event sends one request to your subdomain and another to api.linkrunner.io,
the subdomain isn’t reachable yet and the SDK is using its fallback. Check the CNAME
record and that the subdomain is registered in Manage Domains.Limitations and constraints
Please read these before going live. Most are Shopify platform behaviour, not Linkrunner settings, and cannot be worked around.Shop Pay checkouts run on a different domain
Shop Pay checkouts run on a different domain
shop.app, not
your store. Browser security prevents the pixel from reading anything your storefront
saved.The cart-attribute snippet in Step 2 is what keeps these purchases attributed. If
you use Shop Pay, Step 2 is required.The pixel only runs on your published theme
The pixel only runs on your published theme
Customer privacy settings can block the pixel
Customer privacy settings can block the pixel
Password-protected stores
Password-protected stores
Safari clears stored data after 7 days
Safari clears stored data after 7 days
Ad-blockers and tracking prevention
Ad-blockers and tracking prevention
SDK updates need no changes
SDK updates need no changes
cdn.linkrunner.io URL in Step 1 always serves the current SDK, so there is
nothing to install or keep updated. The snippets and pixel on this page keep working
across SDK updates. If you load the SDK from somewhere else, use v0.1.17 or later,
which is the first version the checkout pixel can read attribution from.Troubleshooting
No events at all
No events at all
ingest. Requests go to api.linkrunner.io, or to your subdomain if you set one up.- No requests: the script tag is missing or the theme wasn’t saved
401responses: wrong token. Confirm you used the Web SDK token
Page views appear but purchases don't
Page views appear but purchases don't
- The pixel was saved but never Connected
- Customer privacy settings are blocking it (see Limitations)
- You tested on a theme preview instead of the published theme
- The token in the pixel doesn’t match the one in the theme
Purchases appear but show no campaign
Purchases appear but show no campaign
Sign-ups don't appear
Sign-ups don't appear
layout/theme.liquid and the
theme was saved.Revenue is missing or zero
Revenue is missing or zero