

Overview
Everflow is a partner marketing platform. Many affiliate networks run on it, and each one has its own tracking domain and Network ID (nid).
You can connect Linkrunner and Everflow in two ways:
Use one option for the same traffic, not both. With both on, a click is counted twice.
Option 1: Send postbacks to Everflow
When a user clicks an Everflow tracking link, Everflow redirects them to your Linkrunner link with its click ID (transaction_id). Linkrunner attributes the install and events, then sends each one back to your Everflow network with that same transaction_id, so Everflow can credit and pay the right partner.
What you need from Everflow
Everflow is white label. Every network runs on its own postback domain and its own Network ID, so there is no single Everflow address to send to.www.serve-eflow-test.com and www.jb8np9ux.com are both Everflow, they are just different networks. You have to copy these two values from the network you actually work with, and each Linkrunner project connects to one network.
In Everflow, go to Control Center → Platform Configurations.
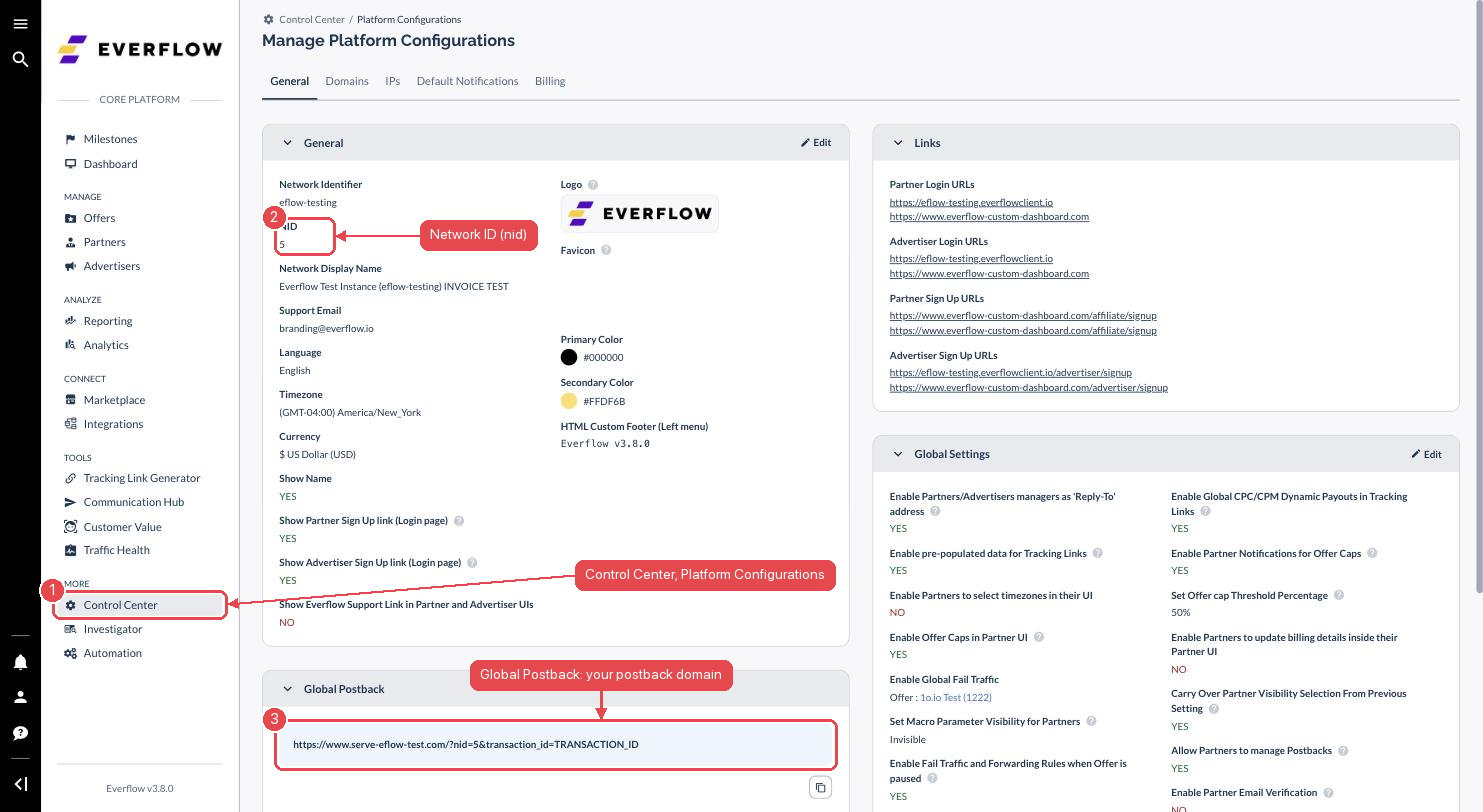
Do not copy the example values above. They are from our test network and will send your
conversions nowhere. Use the NID and domain from your own Everflow account.
1. Connect Everflow in Linkrunner
Go to Integrations → Affiliate Partners → Everflow and click Configure.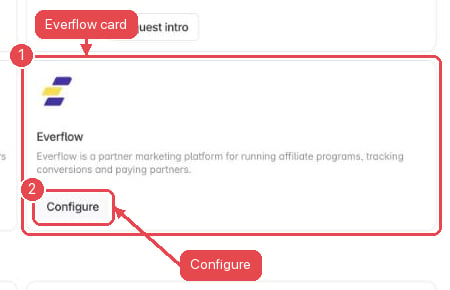
- Enter the Postback domain, Network ID and, if your events are advertiser events, the Advertiser ID. These are the values you copied from Everflow in What you need from Everflow.
- Choose where your events are defined in Everflow:
- Offer events: IDs from the offer’s Revenue & Payout tab. Sent as
event_id. - Advertiser events: IDs from Advertisers → Events. Sent as
adv_event_id.
- Offer events: IDs from the offer’s Revenue & Payout tab. Sent as
- Pick Your Everflow base conversion. Leave it on Install unless your offer converts before the install.
- Turn on Send postbacks to Everflow and click Save connection.
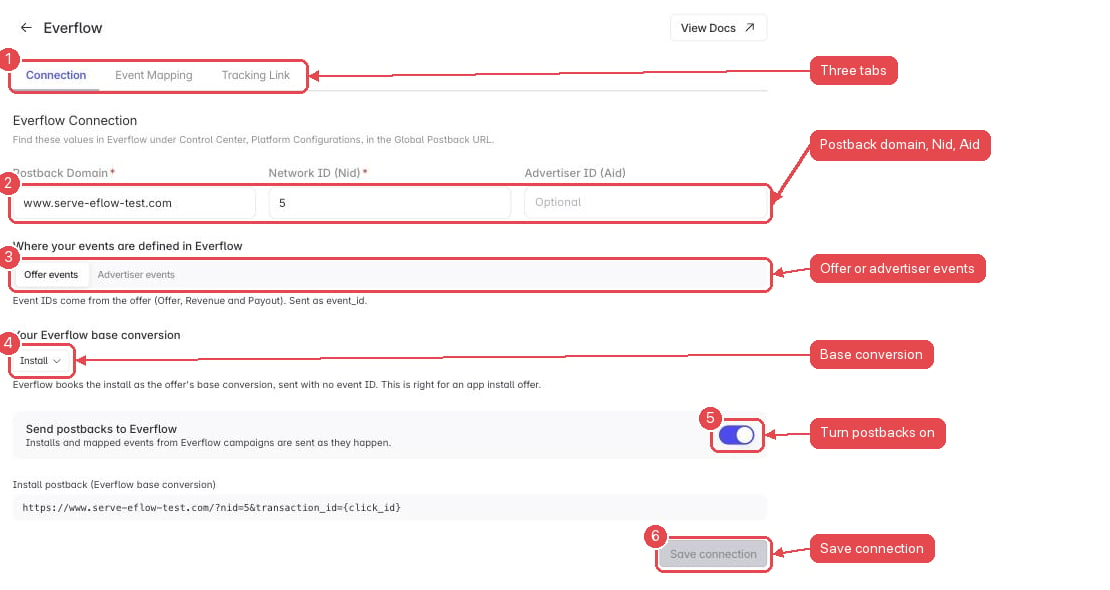
Which conversion is your base conversion
Everflow books the one postback that carries no event ID as the offer’s base conversion. Everything else needs an event ID. Which of your conversions that should be depends on the offer:
Pick the event on the Connection tab and Linkrunner moves the base conversion for you: that event’s postback drops its event ID, and the install gains the one you enter. Exactly one conversion is ever the base conversion, so Everflow never sees two on the same click.
2. Create your events in Everflow
Everflow event IDs are created by you on the offer, and each one is a number Everflow assigns. Create one for every Linkrunner event you want the network to see, before mapping them. In Everflow, open your offer, click Edit, and go to the Revenue & Payout (Events) tab. The Base Conversion Event at the top is the conversion with no event ID. On this offer it is namedInstall, which matches leaving the base conversion on Install in Linkrunner. If your offer converts before the install, name it after that step instead, such as Signup.
Under Additional Conversion Event(s), click Add Additional Event for each further event:
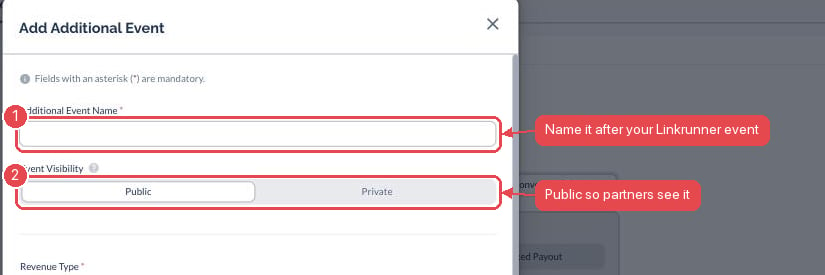
- Additional Event Name: name it after the Linkrunner event it represents, such as
Add to CartorPurchase, so the mapping is obvious later. - Event Visibility: Public lets your partners see the event in their portal. Private hides it.
- Set the Revenue and Payout for the event. A $0 payout still records the event, so use it for steps you want visible but do not pay for.
- Click Add & Continue, then Save the offer.
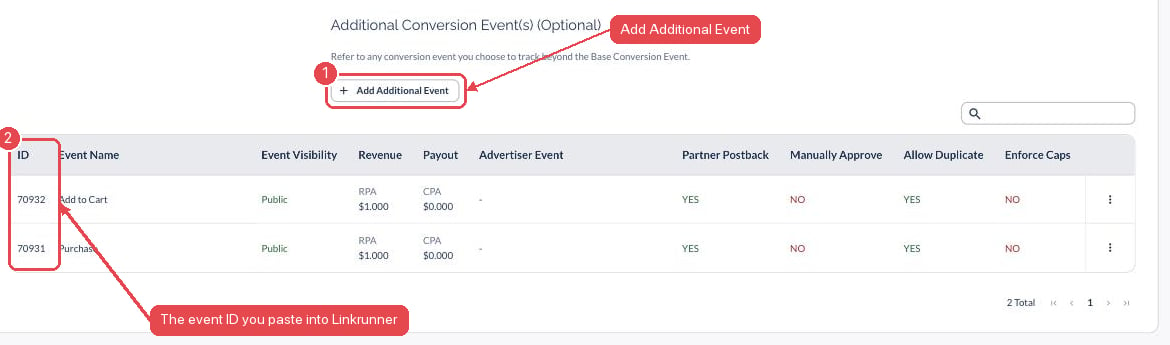
Using advertiser events instead? Create them under Advertisers → your advertiser → Events. Those IDs are sent as
adv_event_id and are shared across every offer for that advertiser, so pick Advertiser events on Linkrunner’s Connection tab.3. Map your events in Linkrunner
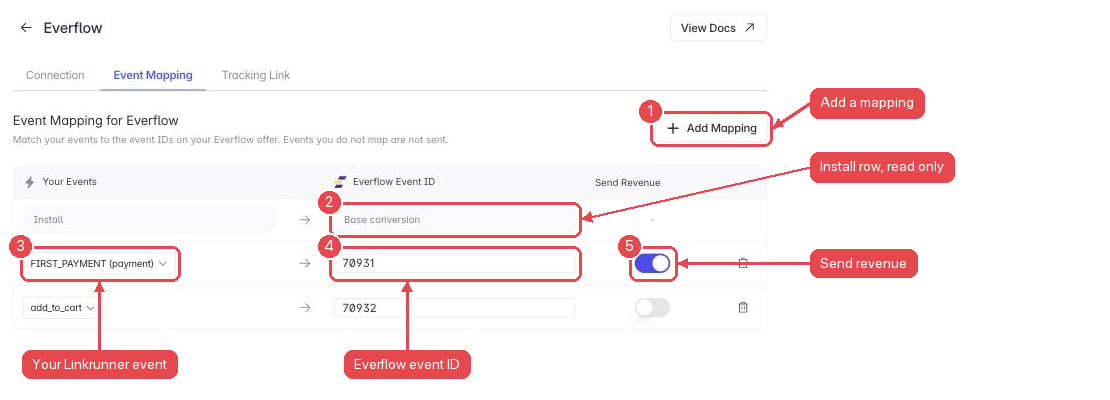
Open the Event Mapping tab and click Add Mapping for each event you want Everflow to receive:- Your Events: an event your app sends, such as
signup,add_to_cartor a payment type likeFIRST_PAYMENT. - Everflow Event ID: the ID Everflow assigned when you created the event above.
- Send Revenue: turn it on to send the purchase amount, for revenue-based payouts.
4. Create an Everflow campaign and copy the link
- Go to Campaigns → Create Link.
- Under Advanced Options → Ad Channel, choose Everflow and create the campaign.
- Copy the link. It is also listed on the Everflow page under the Tracking Link tab.
5. Add the link to your Everflow offer
In Everflow, open your offer, edit Tracking, and paste the link as the Default Landing Page URL.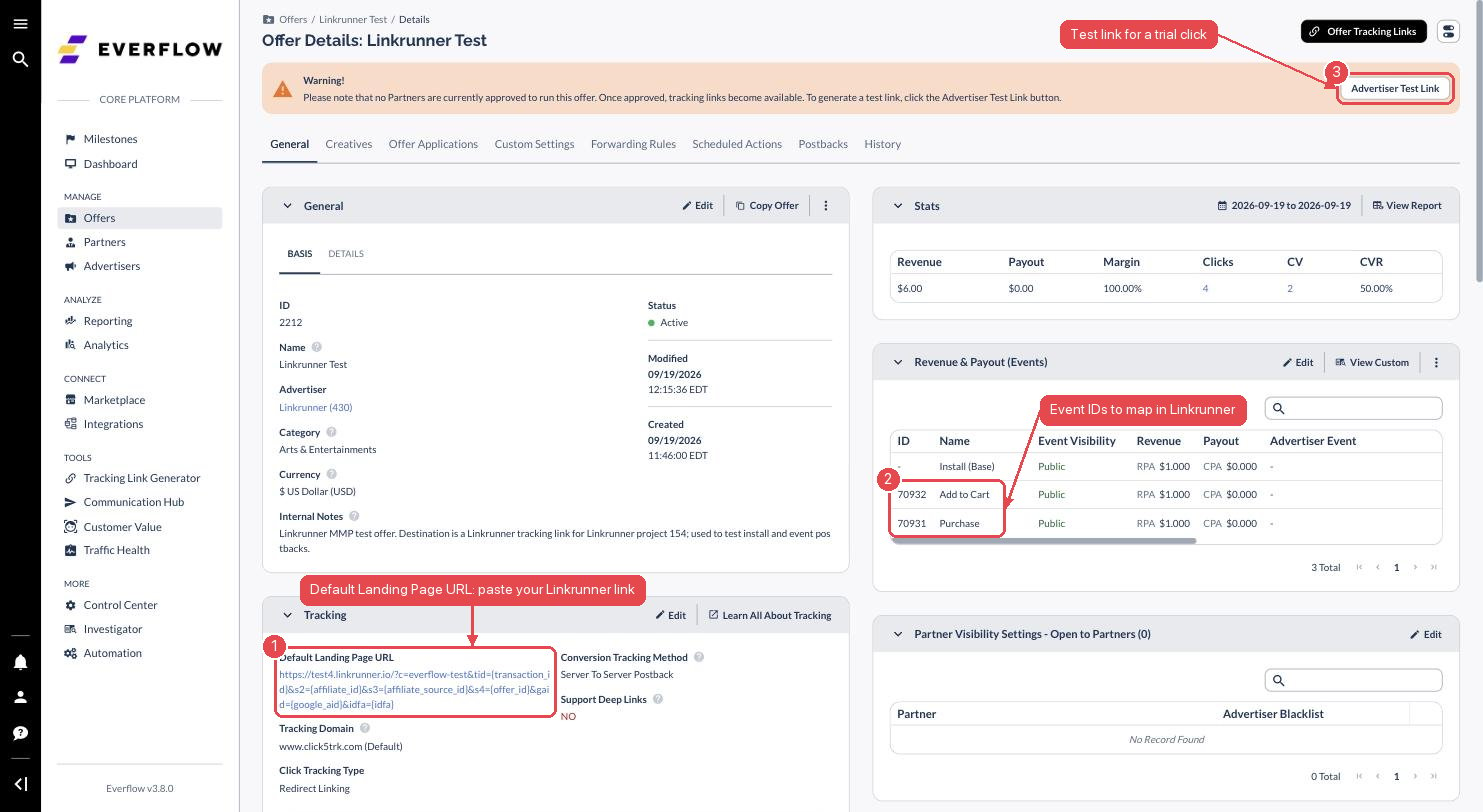
6. Test
- On a phone, open your offer’s Advertiser Test Link.
- Install and open your app, then trigger a mapped event.
- In Everflow, open Reporting → Conversions and filter by your offer. The install and events appear within a few minutes, sent from Linkrunner’s postback IP.
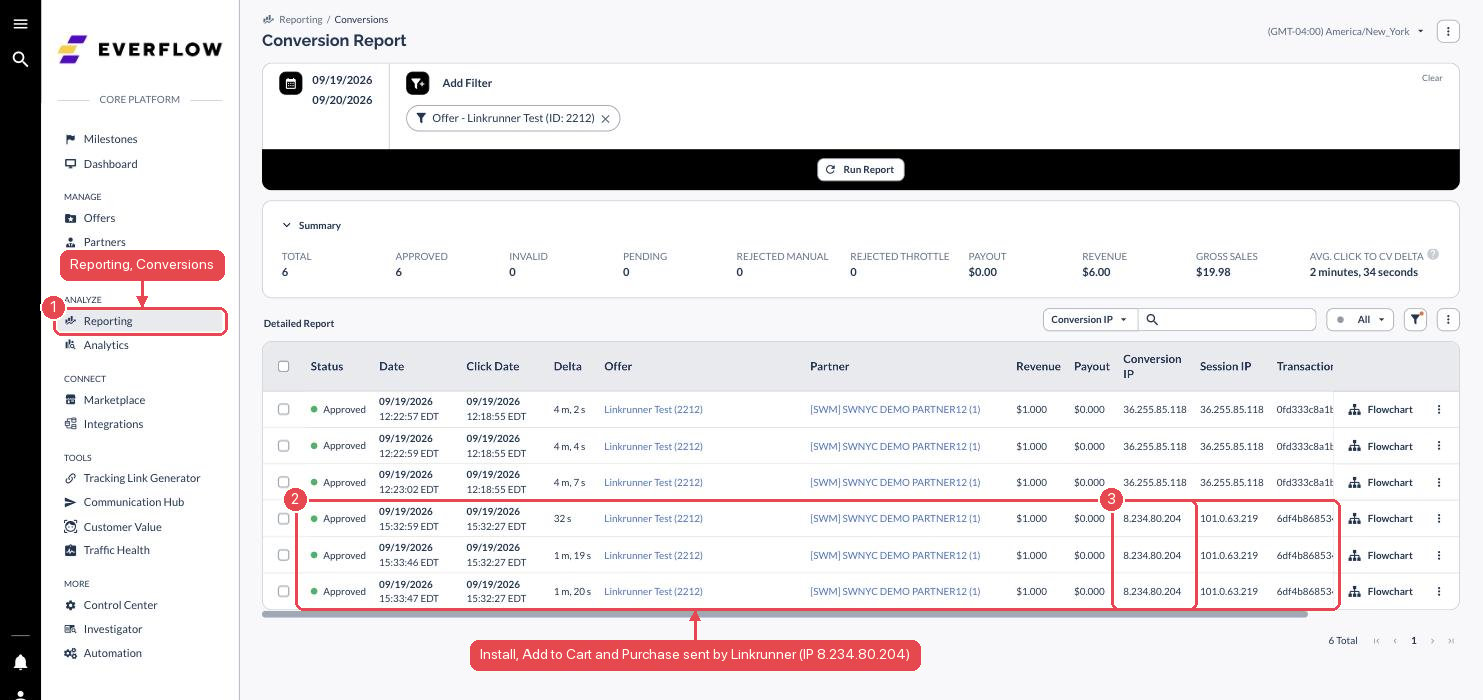
8.234.94.188 and 8.234.80.204.
Postbacks Linkrunner sends
event_id is adv_event_id.
Option 2: Linkrunner card in Everflow
The Linkrunner card is being added to Everflow’s Integrations page. Until it is live, use Option 1.
1. Copy your server key
In Linkrunner, go to Settings → Data Export → Data APIs and copy the server key shown under Authentication (linkrunner-key). The key belongs to one project, so connect each app separately.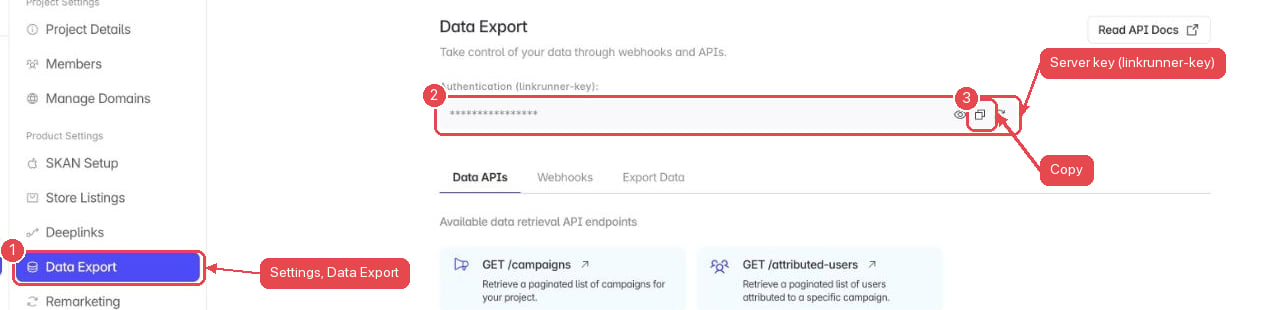
2. Connect in Everflow
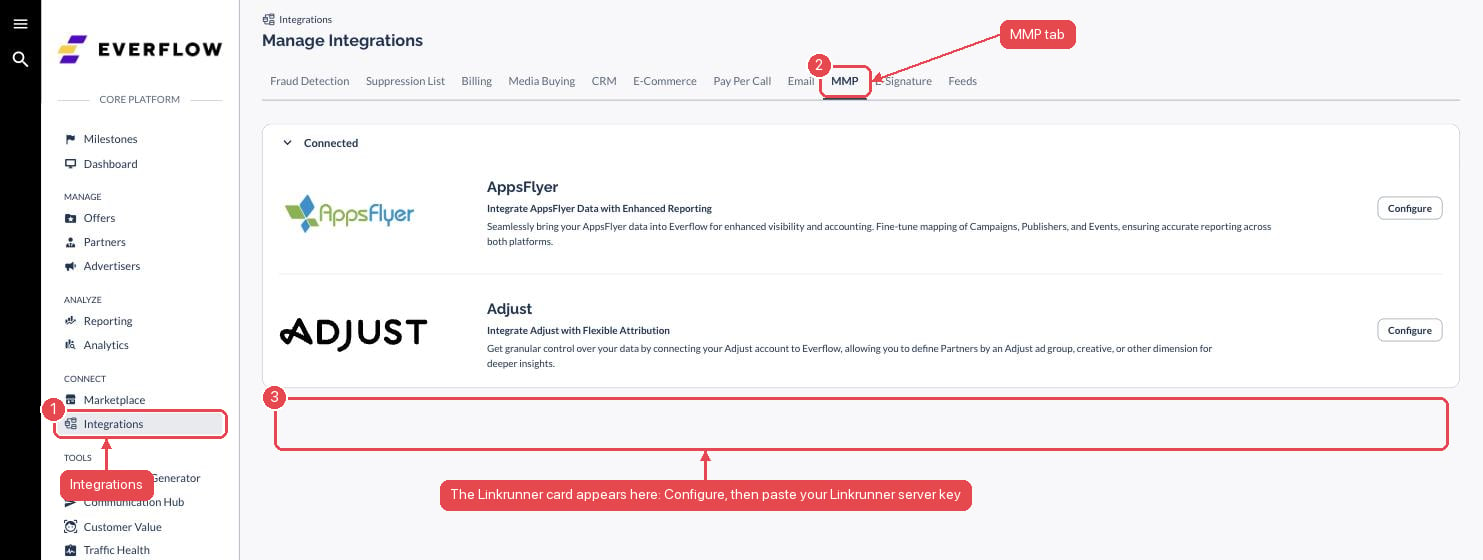
- In Everflow, go to Integrations → MMP.
- On the Linkrunner card, click Configure.
- Paste your server key, give the integration a name, and click Connect.
3. Add your app and map
- Click Add App and pick your Linkrunner app and a sync start date.
- Click Sync Now, then map:
- Linkrunner campaigns to Everflow offers
- Linkrunner sources to Everflow partners, with a payout percentage
- Linkrunner events to Everflow events
- Save. Everflow imports daily data and shows it under the integration’s Report tab.
Troubleshooting
No conversions in Everflow. Check that Send postbacks to Everflow is on, the domain and Network ID match your Global Postback URL, and the offer’s Default Landing Page URL is your Linkrunner link withtid={transaction_id}.
Events show up as base conversions. The event is being sent with the wrong ID type. Switch between Offer events and Advertiser events to match where the ID comes from.
Everflow rejects the postback as an invalid transaction ID. The click did not carry Everflow’s transaction_id. Make sure the link uses curly braces, {transaction_id}, not square brackets.
Need help? Contact support@linkrunner.io.