> ## Documentation Index
> Fetch the complete documentation index at: https://docs.linkrunner.io/llms.txt
> Use this file to discover all available pages before exploring further.
# Android SDK
> Complete guide for integrating Linkrunner in native Android apps
## Requirements
* Android 5.0 (API level 21) or higher
* Android Studio Flamingo (2022.2.1) or newer
* Gradle 8.0+
## Installation
### Step 1: Gradle Setup
Add the Linkrunner SDK to your app's `build.gradle` file:
```gradle theme={null}
dependencies {
implementation 'io.linkrunner:android-sdk:2.1.5'
}
```
Make sure you have the Maven Central repository in your project's `settings.gradle` file:
```gradle theme={null}
dependencyResolutionManagement {
repositories {
google()
mavenCentral()
}
}
```
### Step 2: Required Permissions
Add the following permissions to your `AndroidManifest.xml` file:
```xml theme={null}
```
> **Note:** The `AD_ID` permission (``) is already included in the SDK and is required for collecting device identifiers (GAID). If your app participates in [Designed for Families](https://support.google.com/googleplay/android-developer/topic/9877766?hl=en\&ref_topic=9858052), you should revoke AAID and disable AAID collection. See the [Disabling AAID Collection](#disabling-aaid-collection) section for more details.
### Step 3: Backup Configuration
The SDK provides backup rules to exclude Shared Preferences data from backup. This prevents the retention of the Linkrunner install ID during reinstallation, ensuring accurate detection of new installs and re-installs.
This backup configuration works similarly for all SDKs (React Native, Flutter,
and native Android). The same Android backup rules apply regardless of which
SDK you're using.
#### Adding Backup Rules to Your App
**Add to your `AndroidManifest.xml`**:
```xml theme={null}
```
* `android:fullBackupContent` - Used for Android 6-11
* `android:dataExtractionRules` - Used for Android 12+
#### Merging Backup Rules
If you already have your own backup rules specified (e.g., `android:fullBackupContent="@xml/my_backup_descriptor"` or `android:dataExtractionRules="@xml/my_rules"`), then manually add the following rules to your existing files:
**For legacy backup** (Android 6-11) in `res/xml/my_backup_descriptor`:
```xml theme={null}
```
**For modern backup** (Android 12+) in `res/xml/my_backup_rules.xml`:
```xml theme={null}
```
### Step 4: Encrypted SharedPreferences
**SDK Version Requirement:** Starting from `linkrunner-android` **v3.8.1**, the SDK automatically encrypts the credentials it stores in SharedPreferences. No additional configuration is required — upgrade to v3.8.1 or above to get this behavior by default.
Values written by the SDK are encrypted at rest, with a hardware-protected key generated on the device and stored in the [Android Keystore](https://developer.android.com/training/articles/keystore). The key never leaves the device and is not bundled with the SDK.
If you are upgrading from an earlier version, the SDK will transparently migrate any existing plaintext entries to the encrypted store on the next read after the upgrade — no code changes are needed on your side.
### Step 5: Revoking the AD\_ID Permission (Optional)
According to [Google's Policy](https://support.google.com/googleplay/android-developer/answer/11043825?hl=en), apps that target children must not transmit the Advertising ID.
To revoke the AD\_ID permission, use SDK version 3.5.0 and above. Children apps targeting Android 13 (API 33) and above must prevent the permission from getting merged into their app by adding a revoke declaration to their Manifest. Use the [`setDisableAaidCollection()`](#disabling-aaid-collection) and [`isAaidCollectionDisabled()`](#disabling-aaid-collection) functions to disable AAID collection programmatically:
**AndroidManifest.xml**
```xml theme={null}
```
Make sure to add `xmlns:tools="http://schemas.android.com/tools"` to your manifest tag to use the `tools:node="remove"` attribute. If you disable AAID collection, you should also remove the AD\_ID permission from your manifest to fully comply with Google Play's Family Policy requirements.
For more information, see [Google Play Services documentation](https://developers.google.com/android/reference/com/google/android/gms/ads/identifier/AdvertisingIdClient.Info#public-string-getid).
### Importing in Kotlin/Java
After installation, you can import the SDK in your Kotlin or Java files:
```kotlin theme={null}
// Kotlin
import io.linkrunner.sdk.LinkRunner
```
```java theme={null}
// Java
import io.linkrunner.sdk.LinkRunner;
```
## Initialization (Required)
Initialize the Linkrunner SDK in your application, typically in your `Application` class or main activity:
You can find your project token [here](https://dashboard.linkrunner.io/dashboard?s=members\&m=documentation).
Note: This method returns a void. To get attribution data and deeplink information, use the `getAttributionData` method.
```kotlin theme={null}
import android.app.Application
import io.linkrunner.sdk.LinkRunner
import kotlinx.coroutines.CoroutineScope
import kotlinx.coroutines.Dispatchers
import kotlinx.coroutines.launch
class MyApplication : Application() {
override fun onCreate() {
super.onCreate()
// Initialize LinkRunner with SDK signing
CoroutineScope(Dispatchers.IO).launch {
try {
LinkRunner.getInstance().init(
context = applicationContext,
token = "YOUR_PROJECT_TOKEN",
secretKey = "YOUR_SECRET_KEY", // Optional: Required for SDK signing
keyId = "YOUR_KEY_ID", // Optional: Required for SDK signing
debug = true // Optional: Enable debug mode for development (defaults to false)
)
println("LinkRunner initialized successfully")
} catch (e: Exception) {
println("Exception during initialization: ${e.message}")
}
}
}
}
```
## SDK Signing Parameters (Optional)
For enhanced security, the LinkRunner SDK requires the following signing parameters during initialization:
* **`secretKey`**: A unique secret key used for request signing and authentication
* **`keyId`**: A unique identifier for the key pair used in the signing process
* **`debug`** (optional): Boolean flag to enable debug mode for development (defaults to false)
You can find your project token, secret key, and key ID [here](https://dashboard.linkrunner.io/settings?s=sdk-signing).
## Setting the Customer User ID
Use `setCustomerUserId` to attach your own user identifier to the device **right after `init`**. Once set, the identifier is stored securely on-device and automatically included in every event you track, so you never have to pass it on each `trackEvent` call.
Call it as early as the user's ID is available. This guarantees every event carries a `user_id` from the very first event, and is especially useful for existing users who were already onboarded before this feature shipped.
Available from **Android SDK v3.9.1**.
**Best practice:** set the Customer User ID as early as possible. The `user_id` is only attached to events tracked **after** it's set, and is not applied retroactively. Use a stable, unique identifier from your own system (for example your internal user ID or a UUID) rather than an email address or other PII.
```kotlin theme={null}
import io.linkrunner.sdk.LinkRunner
import kotlinx.coroutines.CoroutineScope
import kotlinx.coroutines.Dispatchers
import kotlinx.coroutines.launch
private fun setCustomerUserId() {
CoroutineScope(Dispatchers.IO).launch {
val result = LinkRunner.getInstance().setCustomerUserId("f47ac10b-58cc-4372-a567-0e02b2c3d479") // Your unique customer user ID (e.g. a UUID)
result
.onSuccess { println("Customer user id set") }
.onFailure { println("Failed to set customer user id: ${it.message}") }
}
}
```
The identifier is stored encrypted on-device and persists across app restarts. Calling `setCustomerUserId` again with a **different** identifier updates the stored value; passing the same identifier is a no-op. `signup()` / `setUserData()` also update it.
## User Identification (Required)
Call the `signup` method as soon as the user is identified — whether through signup or login. This is the moment Linkrunner ties the install (and any future events) to a user identifier.
It is strongly recommended to use the integrated platform's identify function to set a persistent user\_id once it becomes available (typically after signup or login).
* [Mixpanel - ID Management & User Identification](https://docs.mixpanel.com/docs/tracking-methods/id-management/identifying-users-simplified)
* [PostHog - How User Identification Works](https://posthog.com/docs/product-analytics/identify#how-identify-works)
* [Amplitude - Identify Users Documentation](https://amplitude.com/docs/get-started/identify-users)
If the platform's identifier function is not called, you must provide a user identifier for Mixpanel, PostHog, and Amplitude integration.
* mixpanelDistinctId for Mixpanel
* posthogDistinctId for PostHog
* amplitudeDeviceId for Amplitude
```kotlin theme={null}
private fun onSignup() {
CoroutineScope(Dispatchers.IO).launch {
try {
val userData = UserDataRequest(
id = "123", // Required: User ID
name = "John Doe", // Optional
phone = "9876543210", // Optional
email = "user@example.com", // Optional
mixpanelDistinctId = "mixpanel_distinct_id", // Optional - Mixpanel Distinct ID
amplitudeDeviceId = "amplitude_device_id", // Optional - Amplitude User ID
posthogDistinctId = "posthog_distinct_id" // Optional - PostHog Distinct ID
userCreatedAt = "2024-01-01T00:00:00Z", // Optional
isFirstTimeUser = true, // Optional
)
LinkRunner.getInstance().signup(
userData = userData,
additionalData = mapOf("custom_field" to "custom_value") // Optional: Any additional data
)
println("Signup successful")
} catch (e: Exception) {
println("Exception during signup: ${e.message}")
}
}
}
```
## Handle Deeplink
To enable [remarketing and reattribution](/features/remarketing), you need to capture deep links and pass them to the Linkrunner SDK. This allows Linkrunner to detect returning users who open the app via a deep link.
```kotlin theme={null}
class MainActivity : AppCompatActivity() {
override fun onCreate(savedInstanceState: Bundle?) {
super.onCreate(savedInstanceState)
setContentView(R.layout.activity_main)
// Cold start deeplink
handleDeeplinkFromIntent(intent)
}
override fun onNewIntent(intent: Intent) {
super.onNewIntent(intent)
setIntent(intent)
// Warm start deeplink
handleDeeplinkFromIntent(intent)
}
private fun handleDeeplinkFromIntent(intent: Intent) {
intent.data?.let { uri ->
lifecycleScope.launch {
LinkRunner.getInstance().handleDeeplink(uri.toString())
}
}
}
}
```
Linkrunner sends the updated deeplink back after processing. For Linkrunner campaign links, use the returned `deeplink` as the resolved destination instead of the original tracking URL.
```json theme={null}
{
"deeplink": "https://app.yourdomain.com/product/123"
}
```
## Getting Attribution Data
To get attribution data and deeplink information for the current installation, use the `getAttributionData` function:
```kotlin theme={null}
val attributionDataResult = LinkRunner.getInstance().getAttributionData()
attributionDataResult.onSuccess { attributionData ->
println("Attribution data: $attributionData")
// Attribution data includes:
// - deeplink: The deep link URL that led to app installation
// - campaignData: Campaign information
}
```
```kotlin theme={null}
data class AttributionData(
val deeplink: String?,
val campaignData: CampaignData
)
data class CampaignData(
val id: String,
val name: String,
val adNetwork: String?,
val type: String,
val installedAt: String,
val storeClickAt: String?,
val groupName: String,
val assetName: String,
val assetGroupName: String
)
```
## Setting User Data
Call `setUserData` each time the app opens and the user is logged in:
**`setUserData` is optional and is not a replacement for `signup`.** Always call `signup` first as soon as the user is identified (signup or login). Use `setUserData` afterwards only when additional user details become available later — for example, when the user adds a phone number, email, or completes their profile after identification.
```kotlin theme={null}
private fun setUserData() {
CoroutineScope(Dispatchers.IO).launch {
try {
val userData = UserDataRequest(
id = "123", // Required: User ID
name = "John Doe", // Optional
phone = "9876543210", // Optional
email = "user@example.com", // Optional
mixpanelDistinctId = "mixpanel_distinct_id", // Optional - Mixpanel Distinct ID
amplitudeDeviceId = "amplitude_device_id", // Optional - Amplitude User ID
posthogDistinctId = "posthog_distinct_id" // Optional - PostHog Distinct ID
)
val result = LinkRunner.getInstance().setUserData(userData)
result.onSuccess {
println("User data set successfully")
}.onFailure { error ->
println("Error setting user data: ${error.message}")
}
} catch (e: Exception) {
println("Exception setting user data: ${e.message}")
}
}
}
```
## Setting CleverTap ID
Use the `setAdditionalData` method to set CleverTap ID:
```kotlin theme={null}
private fun setIntegrationData() {
CoroutineScope(Dispatchers.IO).launch {
try {
val integrationData: IntegrationData = IntegrationData(clevertapId="YOUR_CLEVERTAP_ID")
val result = LinkRunner.getInstance().setAdditionalData(integrationData)
result.onSuccess {
println("CleverTap ID set successfully")
}.onFailure { error ->
println("Error setting CleverTap ID: ${error.message}")
}
} catch (e: Exception) {
println("Exception setting CleverTap ID: ${e.message}")
}
}
}
```
## Revenue Tracking
Revenue data is only stored and displayed for attributed users. Make sure you have implemented the [`.signup`](#user-registration) function before capturing payments. To attribute a test user, follow the [Integration Testing](/testing/integration-testing) guide. You can verify your events are being captured on the [Events Settings](https://dashboard.linkrunner.io/dashboard/settings/events) page.
### Capturing Payments
Track payment information with the following details:
```kotlin theme={null}
private fun capturePayment() {
CoroutineScope(Dispatchers.IO).launch {
try {
val paymentData = CapturePaymentRequest(
paymentId = "payment_123", // Required: Unique payment identifier
userId = "user123", // Required: User identifier
amount = 99.99, // Required: Payment amount
type = PaymentType.FIRST_PAYMENT, // Optional: Defaults to DEFAULT
// type = PaymentType.SECOND_PAYMENT, // Optional: Defaults to DEFAULT
status = PaymentStatus.PAYMENT_COMPLETED, // Optional: Defaults to PAYMENT_COMPLETED
eventData = mapOf( // Optional: Ecommerce/custom event data
"content_ids" to listOf("product_123"),
"content_type" to "product",
"currency" to "USD",
"value" to 99.99,
"num_items" to 1,
"order_id" to "order_12345",
"contents" to listOf(
mapOf(
"id" to "product_123",
"quantity" to 1,
"item_price" to 99.99
)
)
)
)
val result = LinkRunner.getInstance().capturePayment(paymentData)
result.onSuccess {
println("Payment captured successfully")
}.onFailure { error ->
println("Error capturing payment: ${error.message}")
}
} catch (e: Exception) {
println("Exception capturing payment: ${e.message}")
}
}
}
```
#### Available Payment Types
| Type | Description |
| ---------------------- | ------------------------ |
| `FIRST_PAYMENT` | User's first payment |
| `SECOND_PAYMENT` | User's second payment |
| `WALLET_TOPUP` | Adding funds to wallet |
| `FUNDS_WITHDRAWAL` | Withdrawing funds |
| `SUBSCRIPTION_CREATED` | New subscription created |
| `SUBSCRIPTION_RENEWED` | Subscription renewal |
| `ONE_TIME` | One-time payment |
| `RECURRING` | Recurring payment |
| `DEFAULT` | Default payment type |
#### Available Payment Statuses
| Status | Description |
| ------------------- | ------------------------------ |
| `PAYMENT_INITIATED` | Payment process started |
| `PAYMENT_COMPLETED` | Payment successfully completed |
| `PAYMENT_FAILED` | Payment failed |
| `PAYMENT_CANCELLED` | Payment was cancelled |
### Removing Payments
To remove or refund a payment:
```kotlin theme={null}
private fun removePayment() {
CoroutineScope(Dispatchers.IO).launch {
try {
// Either paymentId or userId must be provided
val removeRequest = RemovePaymentRequest(
paymentId = "payment_123", // Optional: Payment ID to remove
userId = "user123" // Optional: User ID to remove payments for
)
val result = LinkRunner.getInstance().removePayment(removeRequest)
result.onSuccess {
println("Payment removed successfully")
}.onFailure { error ->
println("Error removing payment: ${error.message}")
}
} catch (e: Exception) {
println("Exception removing payment: ${e.message}")
}
}
}
```
## Tracking Custom Events
From **Android SDK v3.9.0**, custom events automatically include the `user_id` you set during `signup()` / `setUserData()`. The SDK stores this identifier securely on-device and attaches it to every `trackEvent` call, so you no longer need to pass it manually. Events tracked before signup are sent without a `user_id`.
Events are only stored and displayed for attributed users. Make sure you have implemented the [`.signup`](#user-registration) function before tracking events. To attribute a test user, follow the [Integration Testing](/testing/integration-testing) guide. You can verify your events are being captured on the [Events Settings](https://dashboard.linkrunner.io/dashboard/settings/events) page. For capturing revenue, it is recommended to use the [`.capturePayment`](#revenue-tracking) method instead of `.trackEvent`.
Track custom events in your app:
```kotlin theme={null}
private fun trackEvent() {
CoroutineScope(Dispatchers.IO).launch {
try {
val result = LinkRunner.getInstance().trackEvent(
eventName = "purchase_initiated", // Event name
eventData = mapOf( // Optional: Event data
"product_id" to "12345",
"category" to "electronics",
"amount" to 99.99 // Include amount as a number for revenue sharing with ad networks like Google and Meta
),
eventId = "order_12345" // Optional: Your own unique event identifier
)
result.onSuccess {
println("Event tracked successfully")
}.onFailure { error ->
println("Error tracking event: ${error.message}")
}
} catch (e: Exception) {
println("Exception tracking event: ${e.message}")
}
}
}
```
#### Parameters for `LinkRunner.getInstance().trackEvent`
* `eventName`: `String` (required) - Name of the event to track
* `eventData`: `Map` (optional) - Key-value pairs for additional event data, including Meta ecommerce properties
* `eventId`: `String` (optional) - Your own unique identifier for the event, useful for deduplication and correlating with your backend
### Revenue Sharing with Ad Networks
To enable revenue sharing with ad networks like Google Ads and Meta, include an `amount` parameter as a number in your custom event data. This allows the ad networks to optimize campaigns based on the revenue value of conversions:
```kotlin theme={null}
private fun trackPurchaseEvent() {
CoroutineScope(Dispatchers.IO).launch {
try {
val result = LinkRunner.getInstance().trackEvent(
eventName = "purchase_completed",
eventData = mapOf(
"product_id" to "12345",
"category" to "electronics",
"amount" to 149.99 // Revenue amount as a number
)
)
result.onSuccess {
println("Purchase event with revenue tracked successfully")
}.onFailure { error ->
println("Error tracking purchase event: ${error.message}")
}
} catch (e: Exception) {
println("Exception tracking purchase event: ${e.message}")
}
}
}
```
For revenue sharing with ad networks to work properly, ensure the `amount` parameter is passed as a number (Double
or Int), not as a string.
## Ecommerce Events
> **Minimum SDK Version:** Ecommerce Event Manager requires `linkrunner-android` **v3.6.0** or above. Please ensure your SDK is updated before using this feature.
If you are tracking Ecommerce events to sync with Meta Catalog Sales, you must format your `eventData` to include Meta's required fields. **You also need to map your custom event to the standard commerce event in the Linkrunner Dashboard.**
For detailed explanations of the required fields like `content_ids`, `contents`, and `value`, refer to our [Meta Commerce Manager documentation](/ecommerce-manager/meta-commerce-manager#understanding-event_data).
### Add To Cart Example
Use the `trackEvent` method to send an `AddToCart` event:
```kotlin theme={null}
private fun trackAddToCart() {
CoroutineScope(Dispatchers.IO).launch {
LinkRunner.getInstance().trackEvent(
eventName = "add_to_cart", // Map this custom event to "AddToCart" in the Linkrunner Dashboard
eventData = mapOf(
"content_ids" to listOf("product_123"),
"contents" to listOf(
mapOf(
"id" to "product_123", // Matches content_ids
"quantity" to 1,
"item_price" to 49.99
)
),
"content_type" to "product",
"currency" to "USD",
"value" to 49.99,
"num_items" to 1
)
)
}
}
```
### View Content Example
Use the `trackEvent` method to send a `ViewContent` event:
```kotlin theme={null}
private fun trackViewContent() {
CoroutineScope(Dispatchers.IO).launch {
LinkRunner.getInstance().trackEvent(
eventName = "view_item", // Map this custom event to "ViewContent" in the Linkrunner Dashboard
eventData = mapOf(
"content_ids" to listOf("product_123"),
"contents" to listOf(
mapOf(
"id" to "product_123", // Matches content_ids
"quantity" to 1,
"item_price" to 49.99
)
),
"content_type" to "product",
"currency" to "USD",
"value" to 49.99,
"num_items" to 1
)
)
}
}
```
### Payment / Purchase Example
Use the `capturePayment` method to send a `Purchase` event containing the ecommerce payload:
```kotlin theme={null}
private fun capturePurchase() {
CoroutineScope(Dispatchers.IO).launch {
try {
val paymentData = CapturePaymentRequest(
paymentId = "payment_456",
userId = "user123",
amount = 49.99,
type = PaymentType.FIRST_PAYMENT, // Map this payment type to "Purchase" in the Linkrunner Dashboard
status = PaymentStatus.PAYMENT_COMPLETED,
eventData = mapOf(
"content_ids" to listOf("product_123"),
"contents" to listOf(
mapOf(
"id" to "product_123", // Matches content_ids
"quantity" to 1,
"item_price" to 49.99
)
),
"content_type" to "product",
"currency" to "USD",
"value" to 49.99,
"num_items" to 1,
"order_id" to "order_abc123" // Required for Purchase events
)
)
LinkRunner.getInstance().capturePayment(paymentData)
} catch (e: Exception) {
println("Exception capturing purchase: ${e.message}")
}
}
}
```
> **Note:** For more information on testing and verifying your ecommerce events, please see our [Testing Ecommerce Events](/ecommerce-manager/meta-commerce-manager#testing-ecommerce-events) guide.
## Enhanced Privacy Controls
The SDK offers options to enhance user privacy:
```kotlin theme={null}
// Enable PII (Personally Identifiable Information) hashing
LinkRunner.getInstance().enablePIIHashing(true)
// Check if PII hashing is enabled
val isHashingEnabled = LinkRunner.getInstance().isPIIHashingEnabled()
```
When PII hashing is enabled, sensitive user data like name, email, and phone number are hashed using SHA-256 before being sent to Linkrunner servers.
## Disabling AAID Collection
**SDK Version Requirement:** The AAID collection disable functionality
requires Android SDK version 3.5.0 or higher.
The SDK provides options to disable AAID (Google Advertising ID) collection. This is useful for apps targeting children or families to comply with Google Play's Family Policy.
Disabling AAID collection is not recommended unless absolutely necessary. The GAID is a primary signal for Google Ads attribution and install matching, so disabling it reduces attribution accuracy. Only disable it if your app is built for children or families and must comply with Google Play's Family Policy.
### Disable AAID Collection
To disable AAID collection, call `setDisableAaidCollection` before SDK initialization:
```kotlin theme={null}
// Disable AAID collection
LinkRunner.getInstance().setDisableAaidCollection(true)
// Check if AAID collection is disabled
val isDisabled = LinkRunner.getInstance().isAaidCollectionDisabled()
```
When AAID collection is disabled, the SDK will not collect or send the Google Advertising ID (GAID) to Linkrunner servers.
### Removing AD\_ID Permission
If you want to completely remove the `AD_ID` permission from your app's manifest (for example, for apps targeting children), you can override the SDK's permission declaration in your `AndroidManifest.xml`. For detailed instructions on revoking the AD\_ID permission, including Google's policy requirements for apps targeting children and Android 13+ (API 33+), see the [Revoking the AD\_ID Permission](#step-4-revoking-the-ad_id-permission-optional) section above.
## Uninstall Tracking
### Before you begin
Here's what you need to know before getting started:
**Requirements:**
* Android SDK 3.2.1 and later
* [Firebase Cloud Messaging in your Android project](https://firebase.google.com/docs/cloud-messaging/android/client)
### Android
Connect Firebase Cloud Messaging (FCM) with Linkrunner
To configure FCM HTTP V1 for uninstalls:
**Enable the FCM API:**
1. Go to the [FCM console](https://console.firebase.google.com).
2. Select a project.
3. Go to **Project Overview** > **Project settings**.
4. Copy the Project ID. This will be required in a later step.
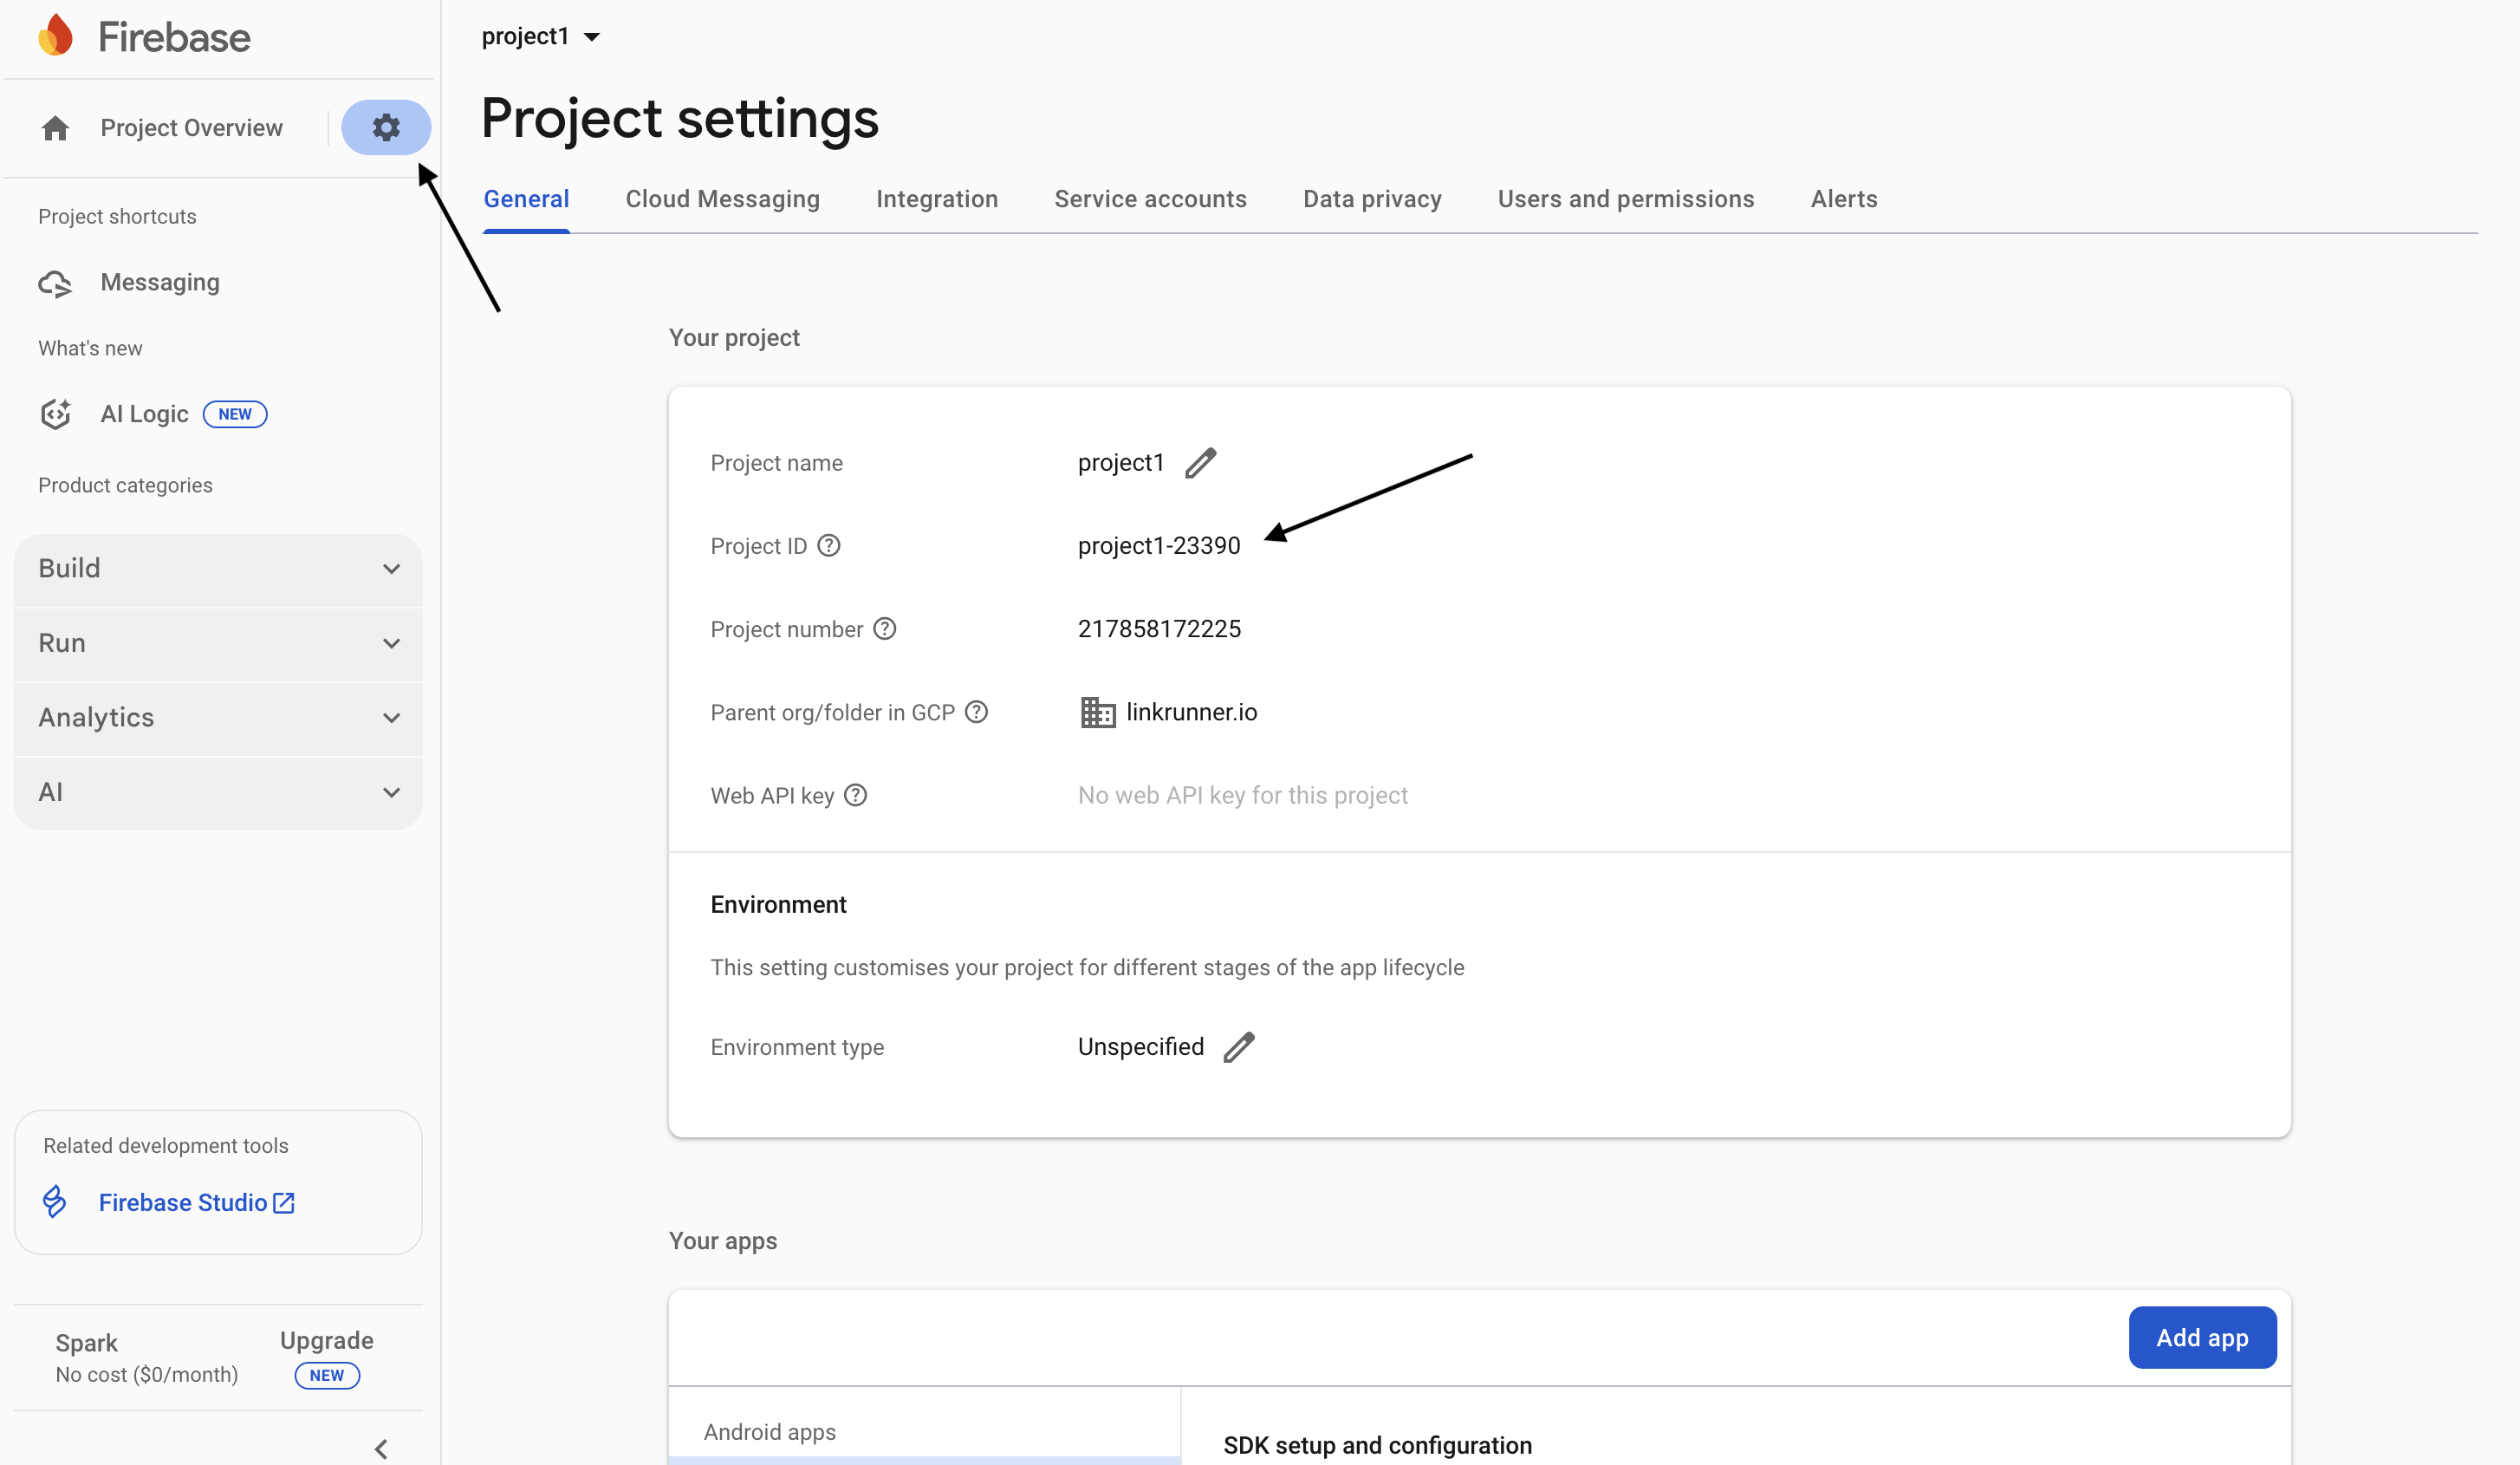 5. Go to the **Cloud Messaging** tab.
6. Make sure that Firebase Cloud Messaging API (V1) is set to Enabled.
**Create a custom role for Linkrunner Uninstall:**
1. Go to the **Service accounts** tab.
2. Click **Manage service account permissions**.
3. A new browser tab opens in Google Cloud Platform.
4. In the side menu, select **Roles**.
5. Click **+ Create role**.
6. Enter the following details:
* **Title**: Linkrunner Uninstalls
* **ID**: lr\_uninstalls
* **Role launch stage**: General availability
7. Click **+ Add permissions**.
8. In **Enter property name or value** field, enter `cloudmessaging.messages.create` and select it from the search results.
5. Go to the **Cloud Messaging** tab.
6. Make sure that Firebase Cloud Messaging API (V1) is set to Enabled.
**Create a custom role for Linkrunner Uninstall:**
1. Go to the **Service accounts** tab.
2. Click **Manage service account permissions**.
3. A new browser tab opens in Google Cloud Platform.
4. In the side menu, select **Roles**.
5. Click **+ Create role**.
6. Enter the following details:
* **Title**: Linkrunner Uninstalls
* **ID**: lr\_uninstalls
* **Role launch stage**: General availability
7. Click **+ Add permissions**.
8. In **Enter property name or value** field, enter `cloudmessaging.messages.create` and select it from the search results.
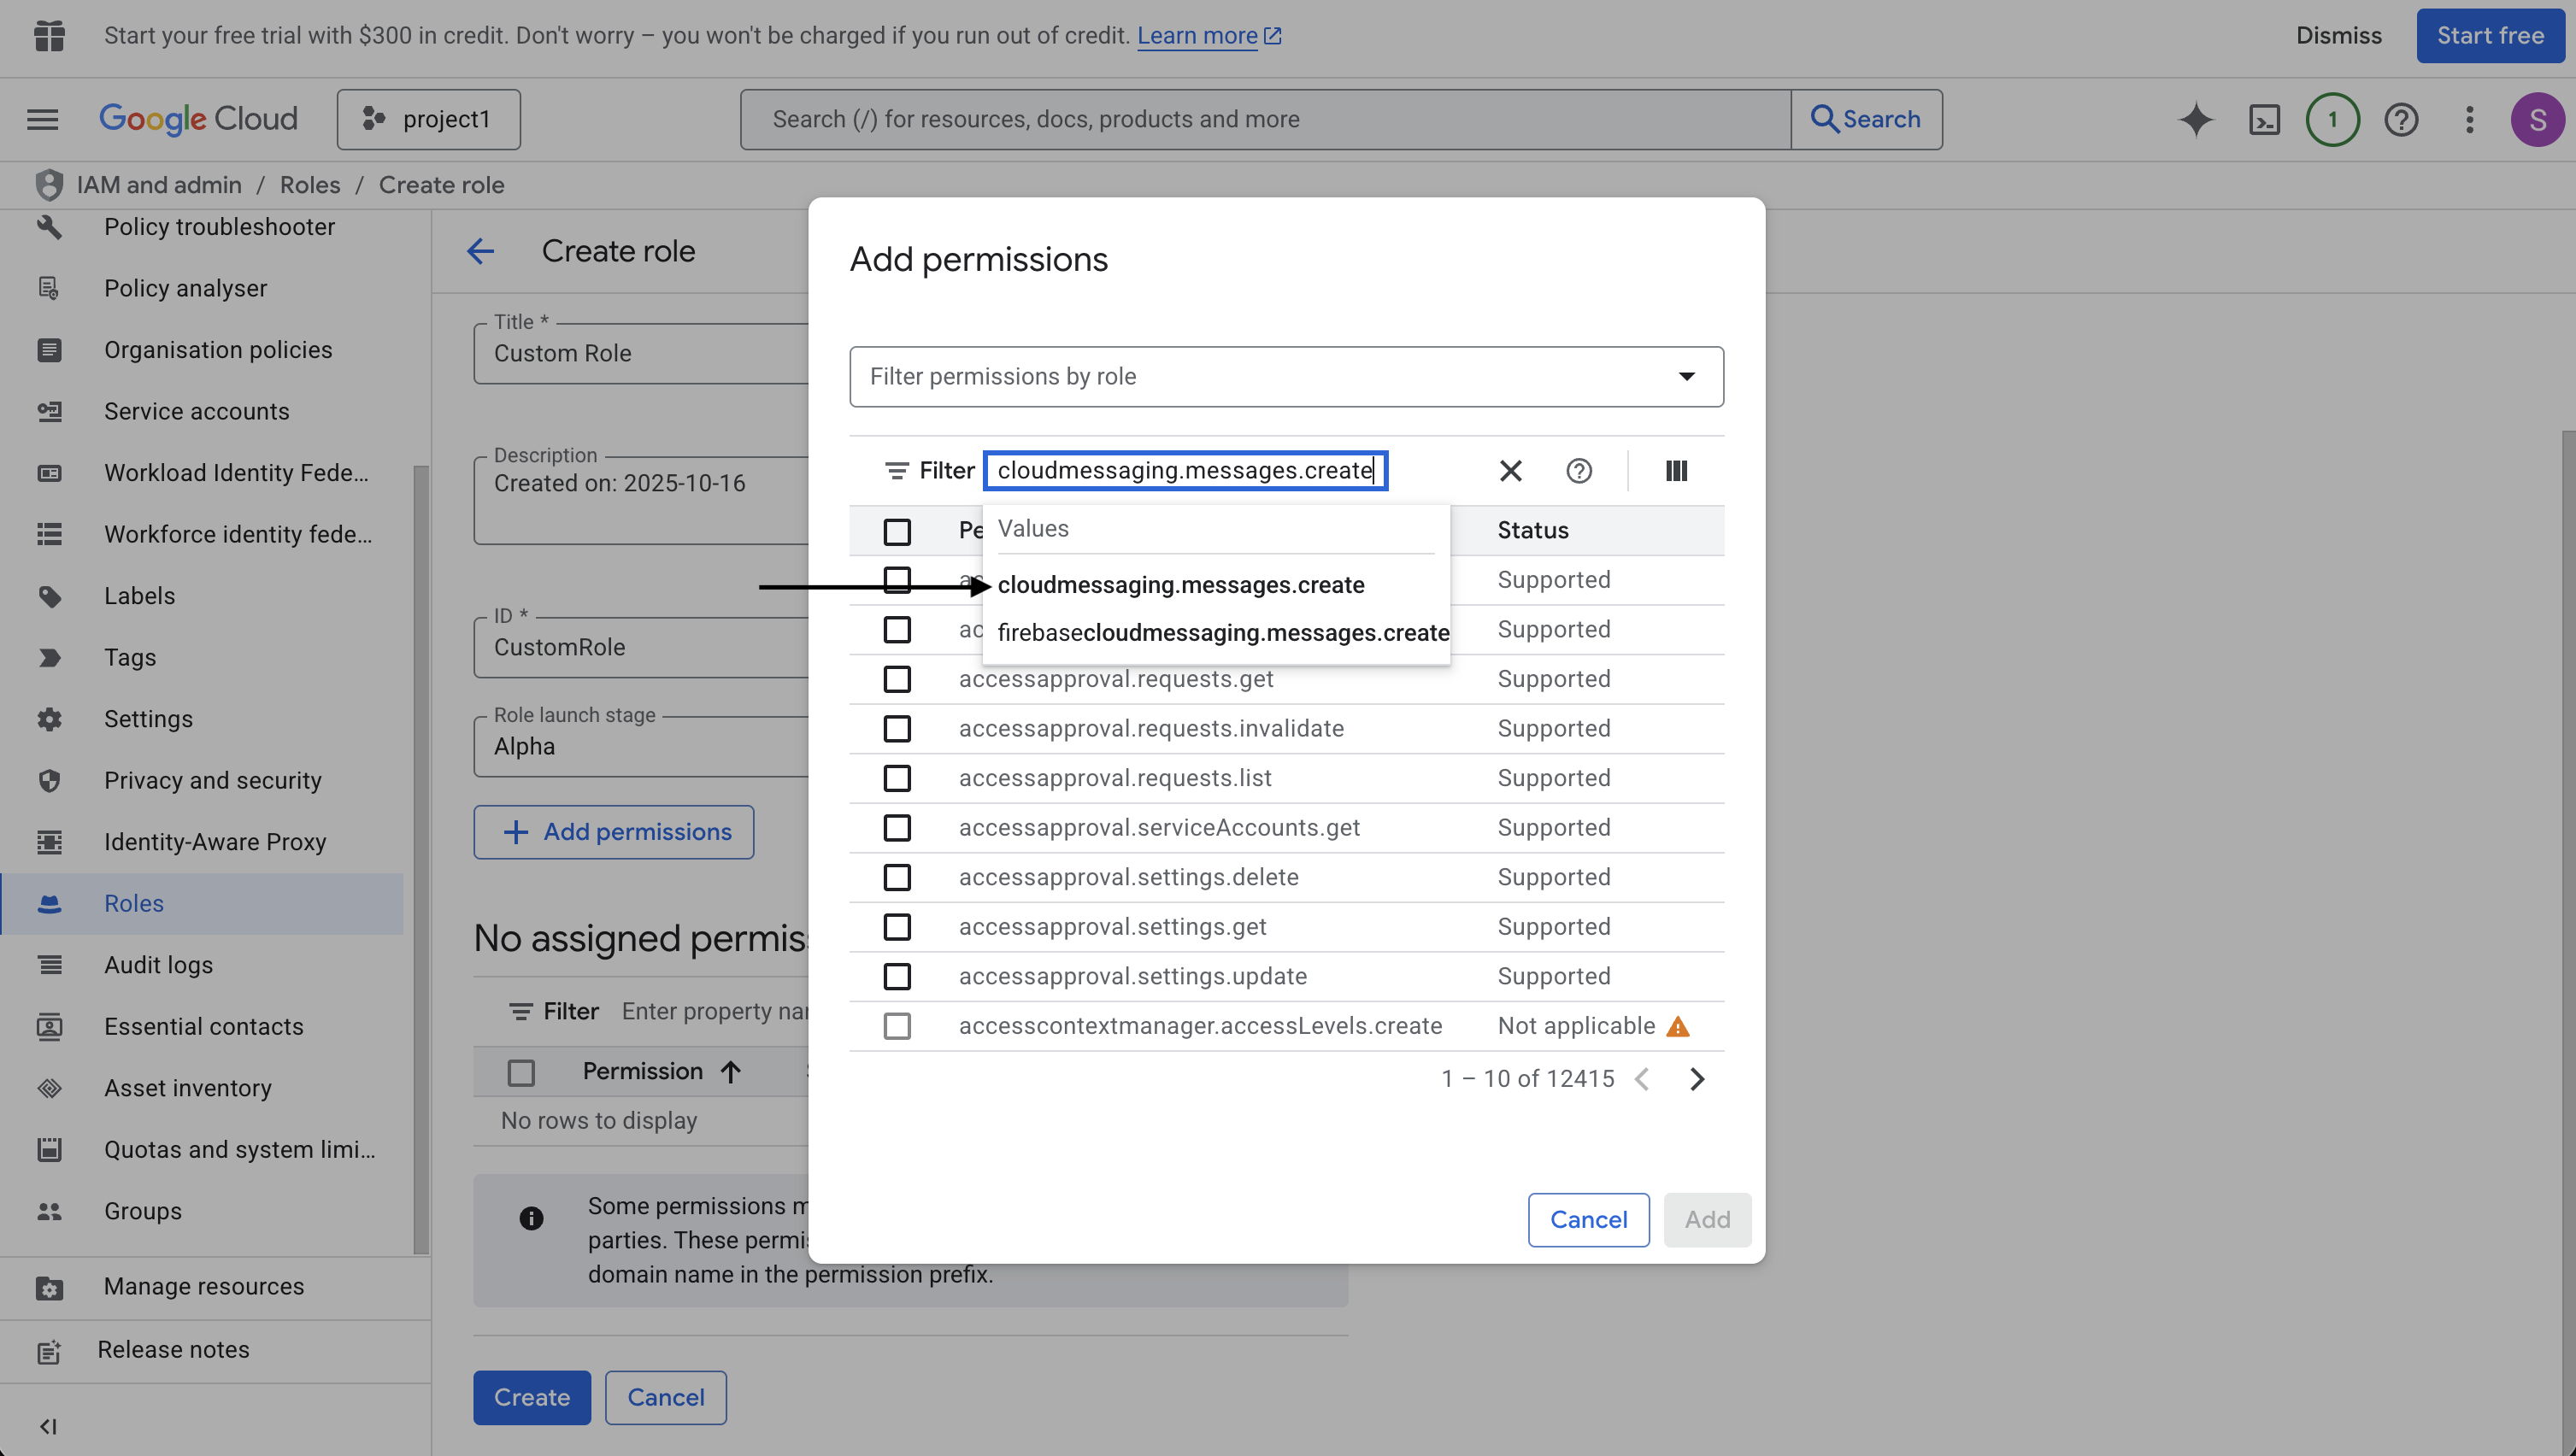 9. Check the **cloudmessaging.messages.create** option and click **Add**.
10. Click **Create**.
**Assign Linkrunner the FCM uninstall role:**
1. In the side menu, select **IAM**.
2. Open the **View by Principals** tab.
3. Click **Grant Access**.
4. In **Add Principals** -> **New principals** field, enter `lr-uninstalls-tracking@lr-uninstalls-tracking.iam.gserviceaccount.com`
5. In **Assign Roles** -> **Select a role** field, enter `Linkrunner Uninstalls` and select it from the search results.
6. Click **Save**.
The Linkrunner service account has been assigned the role of Linkrunner Uninstalls.
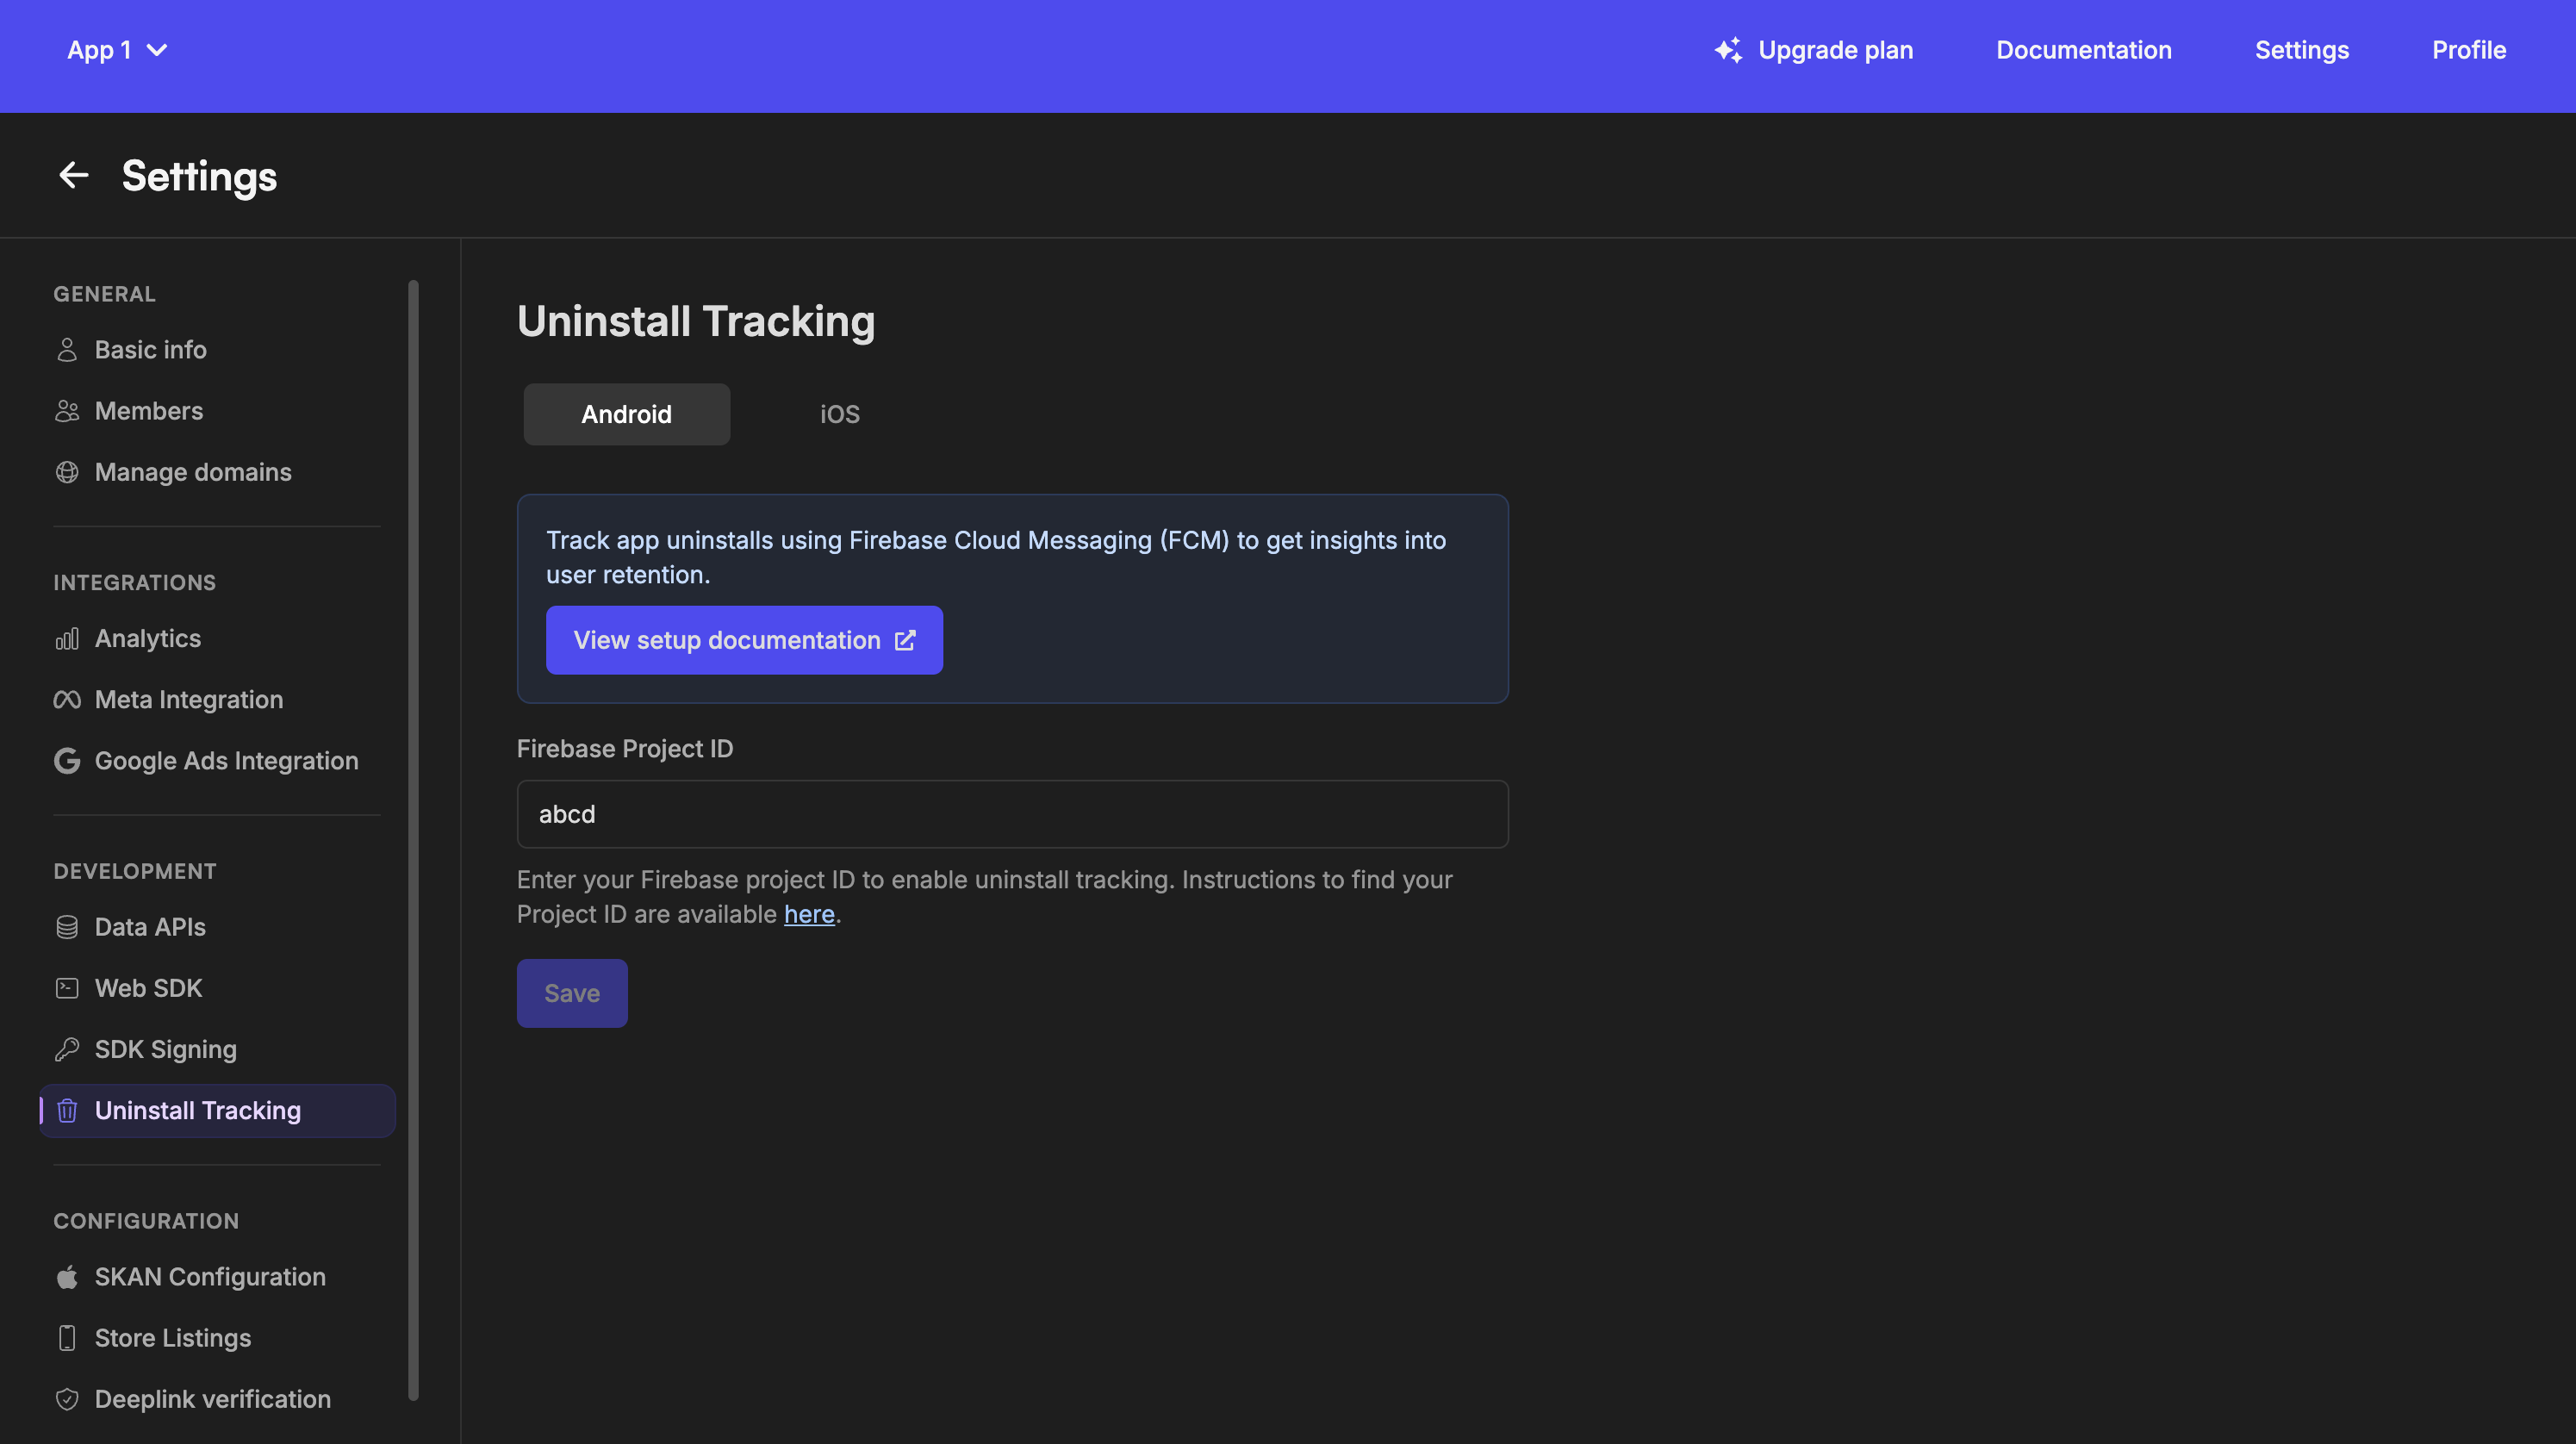
1. In Linkrunner, go to **Settings** > **Uninstall Tracking**.
2. Under the **Android** tab, enter the Firebase Project ID that you copied initially and click **Save**.
9. Check the **cloudmessaging.messages.create** option and click **Add**.
10. Click **Create**.
**Assign Linkrunner the FCM uninstall role:**
1. In the side menu, select **IAM**.
2. Open the **View by Principals** tab.
3. Click **Grant Access**.
4. In **Add Principals** -> **New principals** field, enter `lr-uninstalls-tracking@lr-uninstalls-tracking.iam.gserviceaccount.com`
5. In **Assign Roles** -> **Select a role** field, enter `Linkrunner Uninstalls` and select it from the search results.
6. Click **Save**.
The Linkrunner service account has been assigned the role of Linkrunner Uninstalls.
1. In Linkrunner, go to **Settings** > **Uninstall Tracking**.
2. Under the **Android** tab, enter the Firebase Project ID that you copied initially and click **Save**.
 Follow these instructions to integrate FCM with the Linkrunner SDK:
1. **Set up Firebase Cloud Messaging:**
Set up Firebase Cloud Messaging in your Android app. See the [Firebase Cloud Messaging documentation](https://firebase.google.com/docs/cloud-messaging/android/client) for detailed instructions.
2. Configure your app to provide the device's push token to the Linkrunner SDK.
```kotlin theme={null}
import com.google.firebase.messaging.FirebaseMessaging
import com.google.firebase.messaging.FirebaseMessagingService
import com.google.firebase.messaging.RemoteMessage
import io.linkrunner.sdk.LinkRunner
import kotlinx.coroutines.CoroutineScope
import kotlinx.coroutines.Dispatchers
import kotlinx.coroutines.launch
class MyFirebaseMessagingService : FirebaseMessagingService() {
override fun onNewToken(token: String) {
super.onNewToken(token)
// Send token to Linkrunner SDK
CoroutineScope(Dispatchers.IO).launch {
LinkRunner.getInstance().setPushToken(token)
}
}
override fun onMessageReceived(remoteMessage: RemoteMessage) {
super.onMessageReceived(remoteMessage)
// Check if this is an uninstall tracking notification
if (remoteMessage.data.containsKey("lr-uninstall-tracking")) {
// Silent notification for uninstall tracking, ignore
return
}
// Handle other messages here
}
}
// Initialize token on app start
fun initializePushToken() {
FirebaseMessaging.getInstance().token.addOnCompleteListener { task ->
if (task.isSuccessful) {
val token = task.result
CoroutineScope(Dispatchers.IO).launch {
LinkRunner.getInstance().setPushToken(token)
}
}
}
}
```
Don't forget to register your service in `AndroidManifest.xml`:
```xml theme={null}
```
Custom implementations of FCM's `onMessageReceived` method can unintentionally make uninstall push notifications visible to users, disrupting the intended silent experience. To avoid this, ensure your logic checks if the message contains `lr-uninstall-tracking` and handles it accordingly, as shown in the code example above.
## Function Placement Guide
| Function | Where to Place | When to Call |
| --------------------------------------------------- | -------------------------------------- | ---------------------------------------------- |
| `LinkRunner.getInstance().init` | Application class | Once when app starts |
| `LinkRunner.getInstance().getAttributionData` | Attribution data handling flow | Whenever the attribution data is needed |
| `LinkRunner.getInstance().setAdditionalData` | Integration code | When third-party integration IDs are available |
| `LinkRunner.getInstance().signup` | Identification flow (signup or login) | Once when the user is identified |
| `LinkRunner.getInstance().setUserData` | Authentication logic | Every time app opens with logged-in user |
| `LinkRunner.getInstance().trackEvent` | Throughout app | When specific user actions occur |
| `LinkRunner.getInstance().capturePayment` | Payment processing | When user makes a payment |
| `LinkRunner.getInstance().removePayment` | Refund flow | When payment needs to be removed |
| `LinkRunner.getInstance().setPushToken` | Push notification setup | When FCM token is available |
| `LinkRunner.getInstance().handleDeeplink` | Deep link entry points | When app is opened via a deep link |
| `LinkRunner.getInstance().setDisableAaidCollection` | App initialization or privacy settings | When you need to disable AAID collection |
| `LinkRunner.getInstance().isAaidCollectionDisabled` | Privacy settings or compliance checks | When you need to check AAID collection status |
## Complete Example
Here's a simplified example showing how to integrate Linkrunner in a native Android app:
You can find your project token [here](https://dashboard.linkrunner.io/dashboard?s=members\&m=documentation).
```kotlin theme={null}
import android.app.Application
import android.os.Bundle
import androidx.appcompat.app.AppCompatActivity
import io.linkrunner.sdk.LinkRunner
import io.linkrunner.sdk.models.request.UserDataRequest
import kotlinx.coroutines.CoroutineScope
import kotlinx.coroutines.Dispatchers
import kotlinx.coroutines.launch
class MyApplication : Application() {
override fun onCreate() {
super.onCreate()
// Initialize LinkRunner with SDK signing
CoroutineScope(Dispatchers.IO).launch {
try {
LinkRunner.getInstance().init(
context = applicationContext,
token = "YOUR_PROJECT_TOKEN",
secretKey = "YOUR_SECRET_KEY", // Required for SDK signing
keyId = "YOUR_KEY_ID" // Required for SDK signing
)
} catch (e: Exception) {
println("Error initializing LinkRunner: ${e.message}")
}
}
}
}
class MainActivity : AppCompatActivity() {
override fun onCreate(savedInstanceState: Bundle?) {
super.onCreate(savedInstanceState)
setContentView(R.layout.activity_main)
// Button to track an event
findViewById(R.id.trackEventButton).setOnClickListener {
trackCustomEvent()
}
}
override fun onResume() {
super.onResume()
// Set user data if user is logged in
if (isUserLoggedIn()) {
setUserData()
}
}
private fun isUserLoggedIn(): Boolean {
// Your login check logic
return true
}
private fun setUserData() {
CoroutineScope(Dispatchers.IO).launch {
try {
val userData = UserDataRequest(
id = "123",
name = "John Doe",
email = "user@example.com"
)
LinkRunner.getInstance().setUserData(userData)
} catch (e: Exception) {
println("Error setting user data: ${e.message}")
}
}
}
private fun trackCustomEvent() {
CoroutineScope(Dispatchers.IO).launch {
try {
LinkRunner.getInstance().trackEvent(
eventName = "button_clicked",
eventData = mapOf("screen" to "main")
)
} catch (e: Exception) {
println("Error tracking event: ${e.message}")
}
}
}
}
```
## Next Steps
Validate your setup end-to-end
Configure deep links for your app
## Support
If you encounter issues during integration, contact us at [support@linkrunner.io](mailto:support@linkrunner.io).
Follow these instructions to integrate FCM with the Linkrunner SDK:
1. **Set up Firebase Cloud Messaging:**
Set up Firebase Cloud Messaging in your Android app. See the [Firebase Cloud Messaging documentation](https://firebase.google.com/docs/cloud-messaging/android/client) for detailed instructions.
2. Configure your app to provide the device's push token to the Linkrunner SDK.
```kotlin theme={null}
import com.google.firebase.messaging.FirebaseMessaging
import com.google.firebase.messaging.FirebaseMessagingService
import com.google.firebase.messaging.RemoteMessage
import io.linkrunner.sdk.LinkRunner
import kotlinx.coroutines.CoroutineScope
import kotlinx.coroutines.Dispatchers
import kotlinx.coroutines.launch
class MyFirebaseMessagingService : FirebaseMessagingService() {
override fun onNewToken(token: String) {
super.onNewToken(token)
// Send token to Linkrunner SDK
CoroutineScope(Dispatchers.IO).launch {
LinkRunner.getInstance().setPushToken(token)
}
}
override fun onMessageReceived(remoteMessage: RemoteMessage) {
super.onMessageReceived(remoteMessage)
// Check if this is an uninstall tracking notification
if (remoteMessage.data.containsKey("lr-uninstall-tracking")) {
// Silent notification for uninstall tracking, ignore
return
}
// Handle other messages here
}
}
// Initialize token on app start
fun initializePushToken() {
FirebaseMessaging.getInstance().token.addOnCompleteListener { task ->
if (task.isSuccessful) {
val token = task.result
CoroutineScope(Dispatchers.IO).launch {
LinkRunner.getInstance().setPushToken(token)
}
}
}
}
```
Don't forget to register your service in `AndroidManifest.xml`:
```xml theme={null}
```
Custom implementations of FCM's `onMessageReceived` method can unintentionally make uninstall push notifications visible to users, disrupting the intended silent experience. To avoid this, ensure your logic checks if the message contains `lr-uninstall-tracking` and handles it accordingly, as shown in the code example above.
## Function Placement Guide
| Function | Where to Place | When to Call |
| --------------------------------------------------- | -------------------------------------- | ---------------------------------------------- |
| `LinkRunner.getInstance().init` | Application class | Once when app starts |
| `LinkRunner.getInstance().getAttributionData` | Attribution data handling flow | Whenever the attribution data is needed |
| `LinkRunner.getInstance().setAdditionalData` | Integration code | When third-party integration IDs are available |
| `LinkRunner.getInstance().signup` | Identification flow (signup or login) | Once when the user is identified |
| `LinkRunner.getInstance().setUserData` | Authentication logic | Every time app opens with logged-in user |
| `LinkRunner.getInstance().trackEvent` | Throughout app | When specific user actions occur |
| `LinkRunner.getInstance().capturePayment` | Payment processing | When user makes a payment |
| `LinkRunner.getInstance().removePayment` | Refund flow | When payment needs to be removed |
| `LinkRunner.getInstance().setPushToken` | Push notification setup | When FCM token is available |
| `LinkRunner.getInstance().handleDeeplink` | Deep link entry points | When app is opened via a deep link |
| `LinkRunner.getInstance().setDisableAaidCollection` | App initialization or privacy settings | When you need to disable AAID collection |
| `LinkRunner.getInstance().isAaidCollectionDisabled` | Privacy settings or compliance checks | When you need to check AAID collection status |
## Complete Example
Here's a simplified example showing how to integrate Linkrunner in a native Android app:
You can find your project token [here](https://dashboard.linkrunner.io/dashboard?s=members\&m=documentation).
```kotlin theme={null}
import android.app.Application
import android.os.Bundle
import androidx.appcompat.app.AppCompatActivity
import io.linkrunner.sdk.LinkRunner
import io.linkrunner.sdk.models.request.UserDataRequest
import kotlinx.coroutines.CoroutineScope
import kotlinx.coroutines.Dispatchers
import kotlinx.coroutines.launch
class MyApplication : Application() {
override fun onCreate() {
super.onCreate()
// Initialize LinkRunner with SDK signing
CoroutineScope(Dispatchers.IO).launch {
try {
LinkRunner.getInstance().init(
context = applicationContext,
token = "YOUR_PROJECT_TOKEN",
secretKey = "YOUR_SECRET_KEY", // Required for SDK signing
keyId = "YOUR_KEY_ID" // Required for SDK signing
)
} catch (e: Exception) {
println("Error initializing LinkRunner: ${e.message}")
}
}
}
}
class MainActivity : AppCompatActivity() {
override fun onCreate(savedInstanceState: Bundle?) {
super.onCreate(savedInstanceState)
setContentView(R.layout.activity_main)
// Button to track an event
findViewById(R.id.trackEventButton).setOnClickListener {
trackCustomEvent()
}
}
override fun onResume() {
super.onResume()
// Set user data if user is logged in
if (isUserLoggedIn()) {
setUserData()
}
}
private fun isUserLoggedIn(): Boolean {
// Your login check logic
return true
}
private fun setUserData() {
CoroutineScope(Dispatchers.IO).launch {
try {
val userData = UserDataRequest(
id = "123",
name = "John Doe",
email = "user@example.com"
)
LinkRunner.getInstance().setUserData(userData)
} catch (e: Exception) {
println("Error setting user data: ${e.message}")
}
}
}
private fun trackCustomEvent() {
CoroutineScope(Dispatchers.IO).launch {
try {
LinkRunner.getInstance().trackEvent(
eventName = "button_clicked",
eventData = mapOf("screen" to "main")
)
} catch (e: Exception) {
println("Error tracking event: ${e.message}")
}
}
}
}
```
## Next Steps
Validate your setup end-to-end
Configure deep links for your app
## Support
If you encounter issues during integration, contact us at [support@linkrunner.io](mailto:support@linkrunner.io).