> ## Documentation Index
> Fetch the complete documentation index at: https://docs.linkrunner.io/llms.txt
> Use this file to discover all available pages before exploring further.
# Event Mapping
> Choose which of a customer's events reach you, what they are called, and which customers a rule applies to
## What this page is for
**Event Mapping** answers two questions:
* Which events will reach your endpoint at all?
* What name will each one arrive under?
Open it from the left sidebar in the affiliate dashboard. You can also go straight to it: [dashboard.linkrunner.io/affiliate/event-mapping](https://dashboard.linkrunner.io/affiliate/event-mapping).
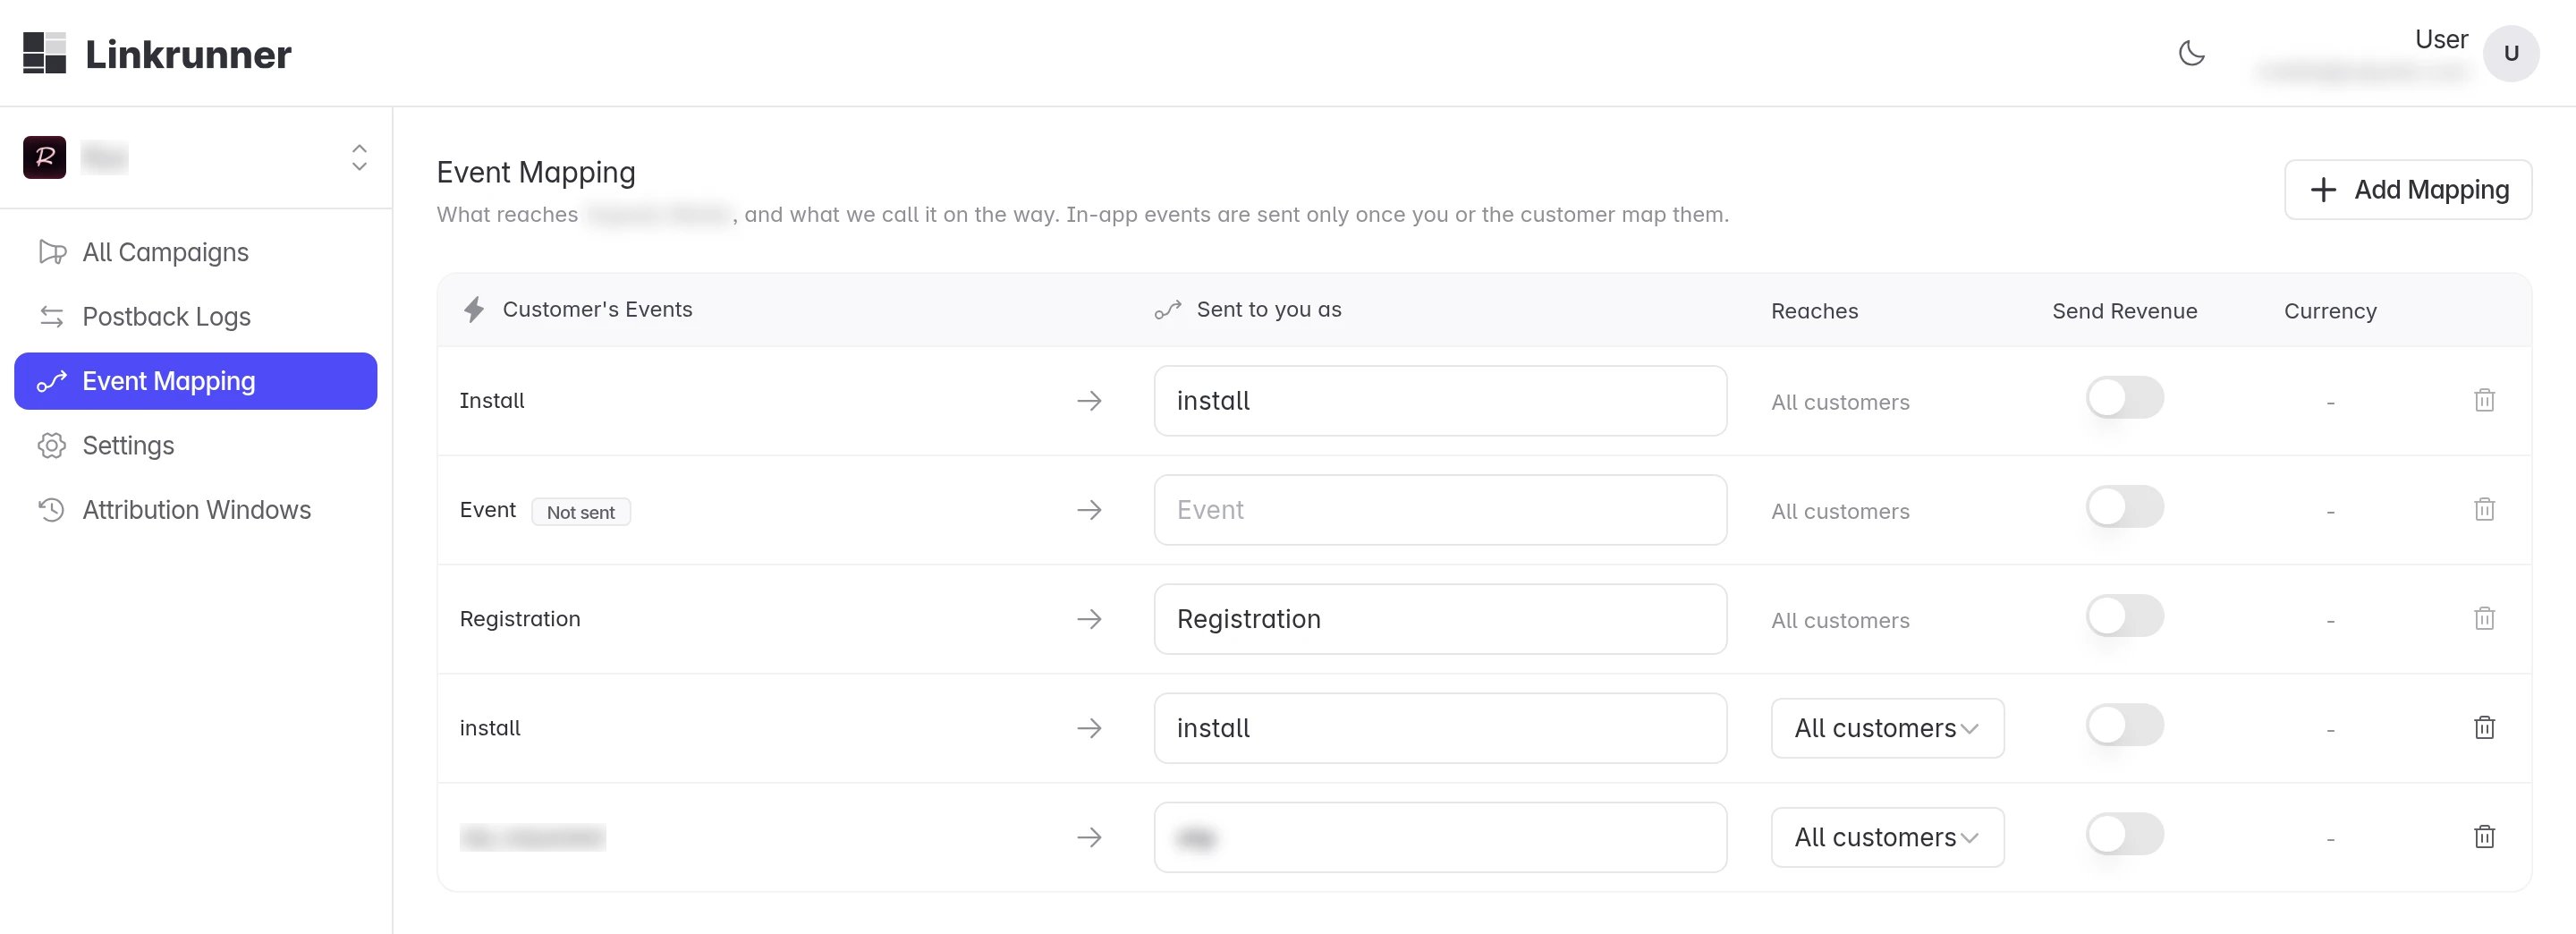 The page shows one customer at a time. Switch customers with the project picker at the top of the sidebar. Event names are agreed per customer, so the table changes when you switch.
The screenshots on this page have customer names, partner names, and custom event names blurred.
## Reading the table
The page shows one customer at a time. Switch customers with the project picker at the top of the sidebar. Event names are agreed per customer, so the table changes when you switch.
The screenshots on this page have customer names, partner names, and custom event names blurred.
## Reading the table
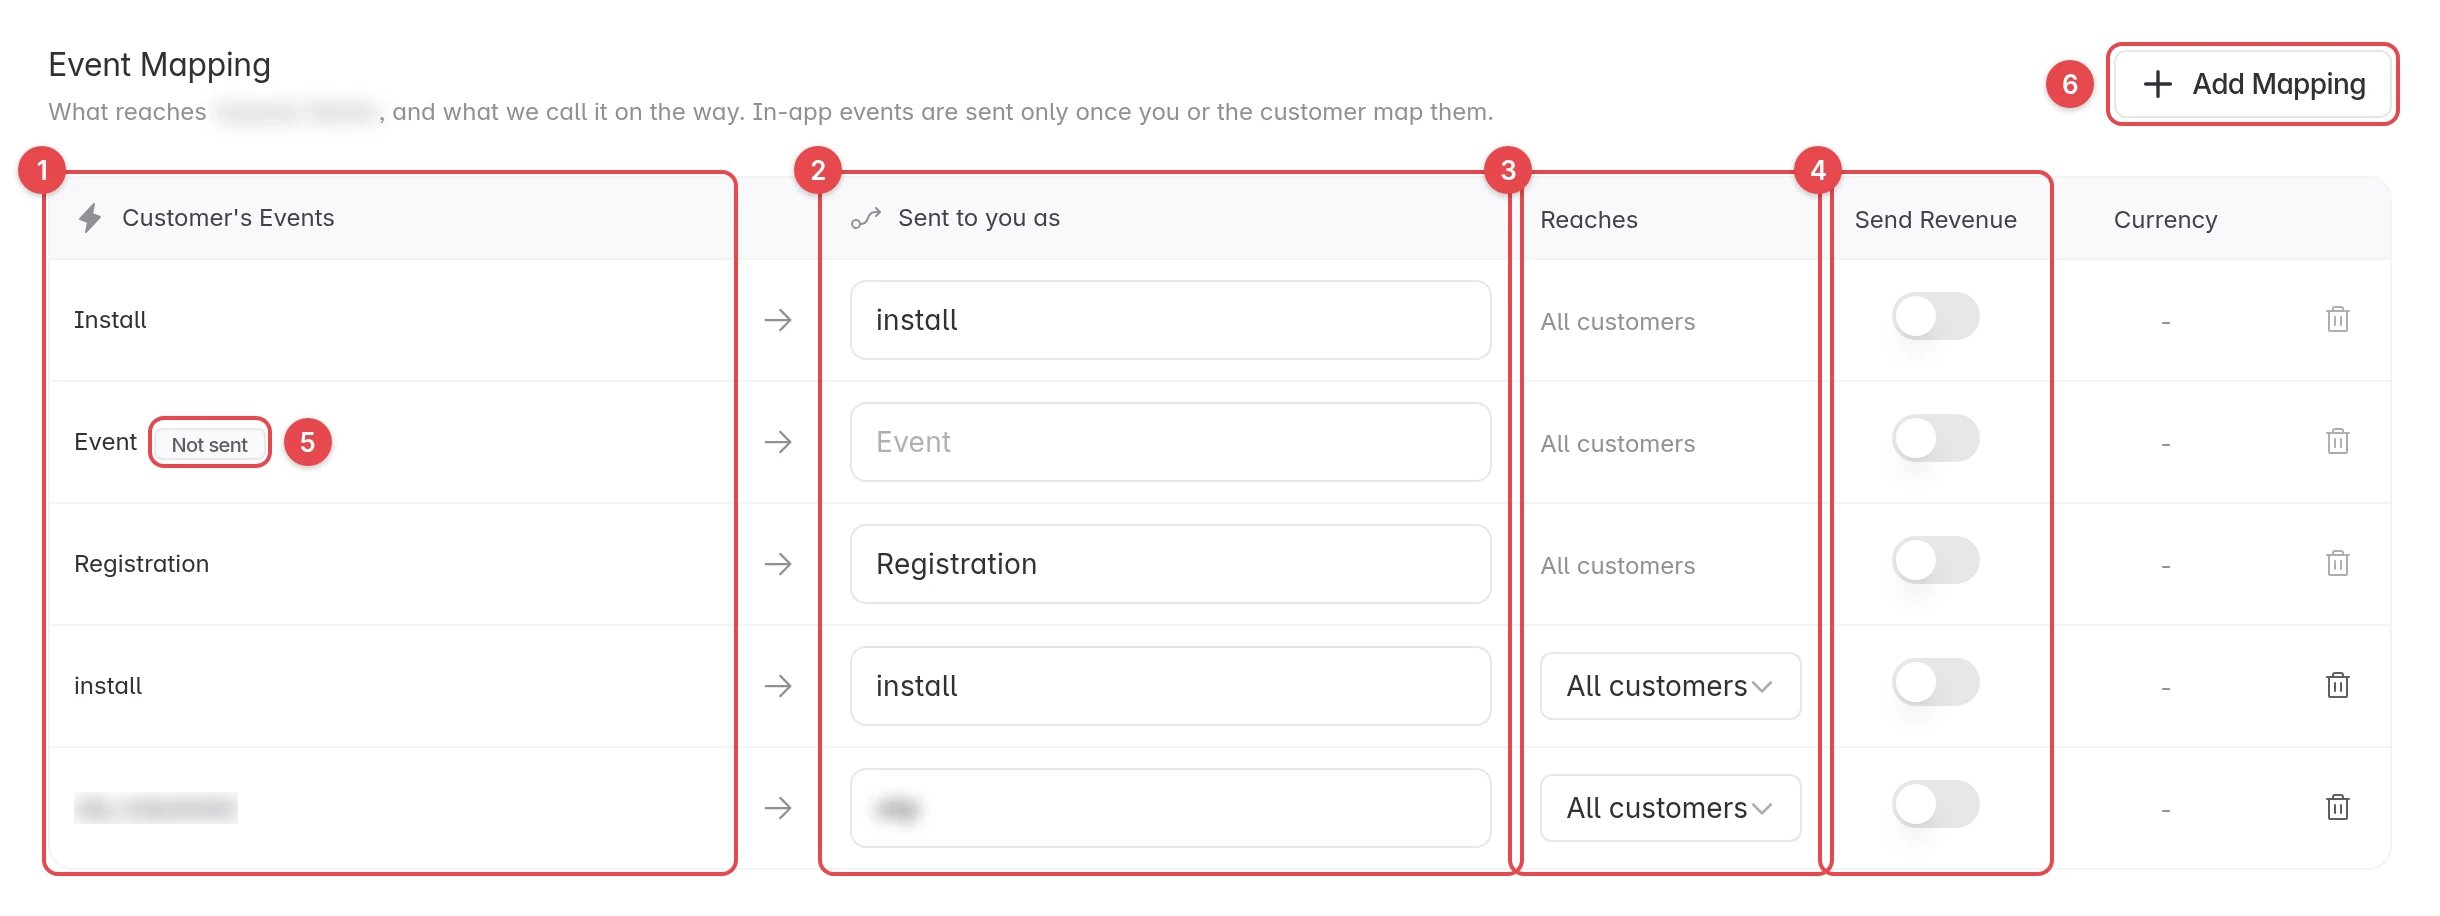 1. **Customer's Events.** The event as the customer names it in their app. `Install`, `Event`, and `Registration` are your standing rows, one per postback type. The rows below them are your named mappings.
2. **Sent to you as.** The name the event arrives under in your postback. Leave it empty to receive the event's own name. Type a new name and click outside the box to save it.
3. **Reaches.** Which customers the rule applies to. See [The Reaches dropdown](#the-reaches-dropdown) below.
4. **Send Revenue.** Turn this on to receive the amount and currency with the event. Payment events always carry their amount, so the switch is locked on for them.
5. **Not sent.** The standing **Event** row is a template, not a delivery. In-app events reach you only after you or the customer maps them by name.
6. **Add Mapping.** Creates a new rule. See [Add a mapping](#add-a-mapping).
Installs and registrations are sent automatically. In-app events are not. If an event is missing from your postbacks, it usually has no mapping.
## The Reaches dropdown
**Reaches** decides how wide a rule is: every customer you work with, or only the one you are looking at.
1. **Customer's Events.** The event as the customer names it in their app. `Install`, `Event`, and `Registration` are your standing rows, one per postback type. The rows below them are your named mappings.
2. **Sent to you as.** The name the event arrives under in your postback. Leave it empty to receive the event's own name. Type a new name and click outside the box to save it.
3. **Reaches.** Which customers the rule applies to. See [The Reaches dropdown](#the-reaches-dropdown) below.
4. **Send Revenue.** Turn this on to receive the amount and currency with the event. Payment events always carry their amount, so the switch is locked on for them.
5. **Not sent.** The standing **Event** row is a template, not a delivery. In-app events reach you only after you or the customer maps them by name.
6. **Add Mapping.** Creates a new rule. See [Add a mapping](#add-a-mapping).
Installs and registrations are sent automatically. In-app events are not. If an event is missing from your postbacks, it usually has no mapping.
## The Reaches dropdown
**Reaches** decides how wide a rule is: every customer you work with, or only the one you are looking at.
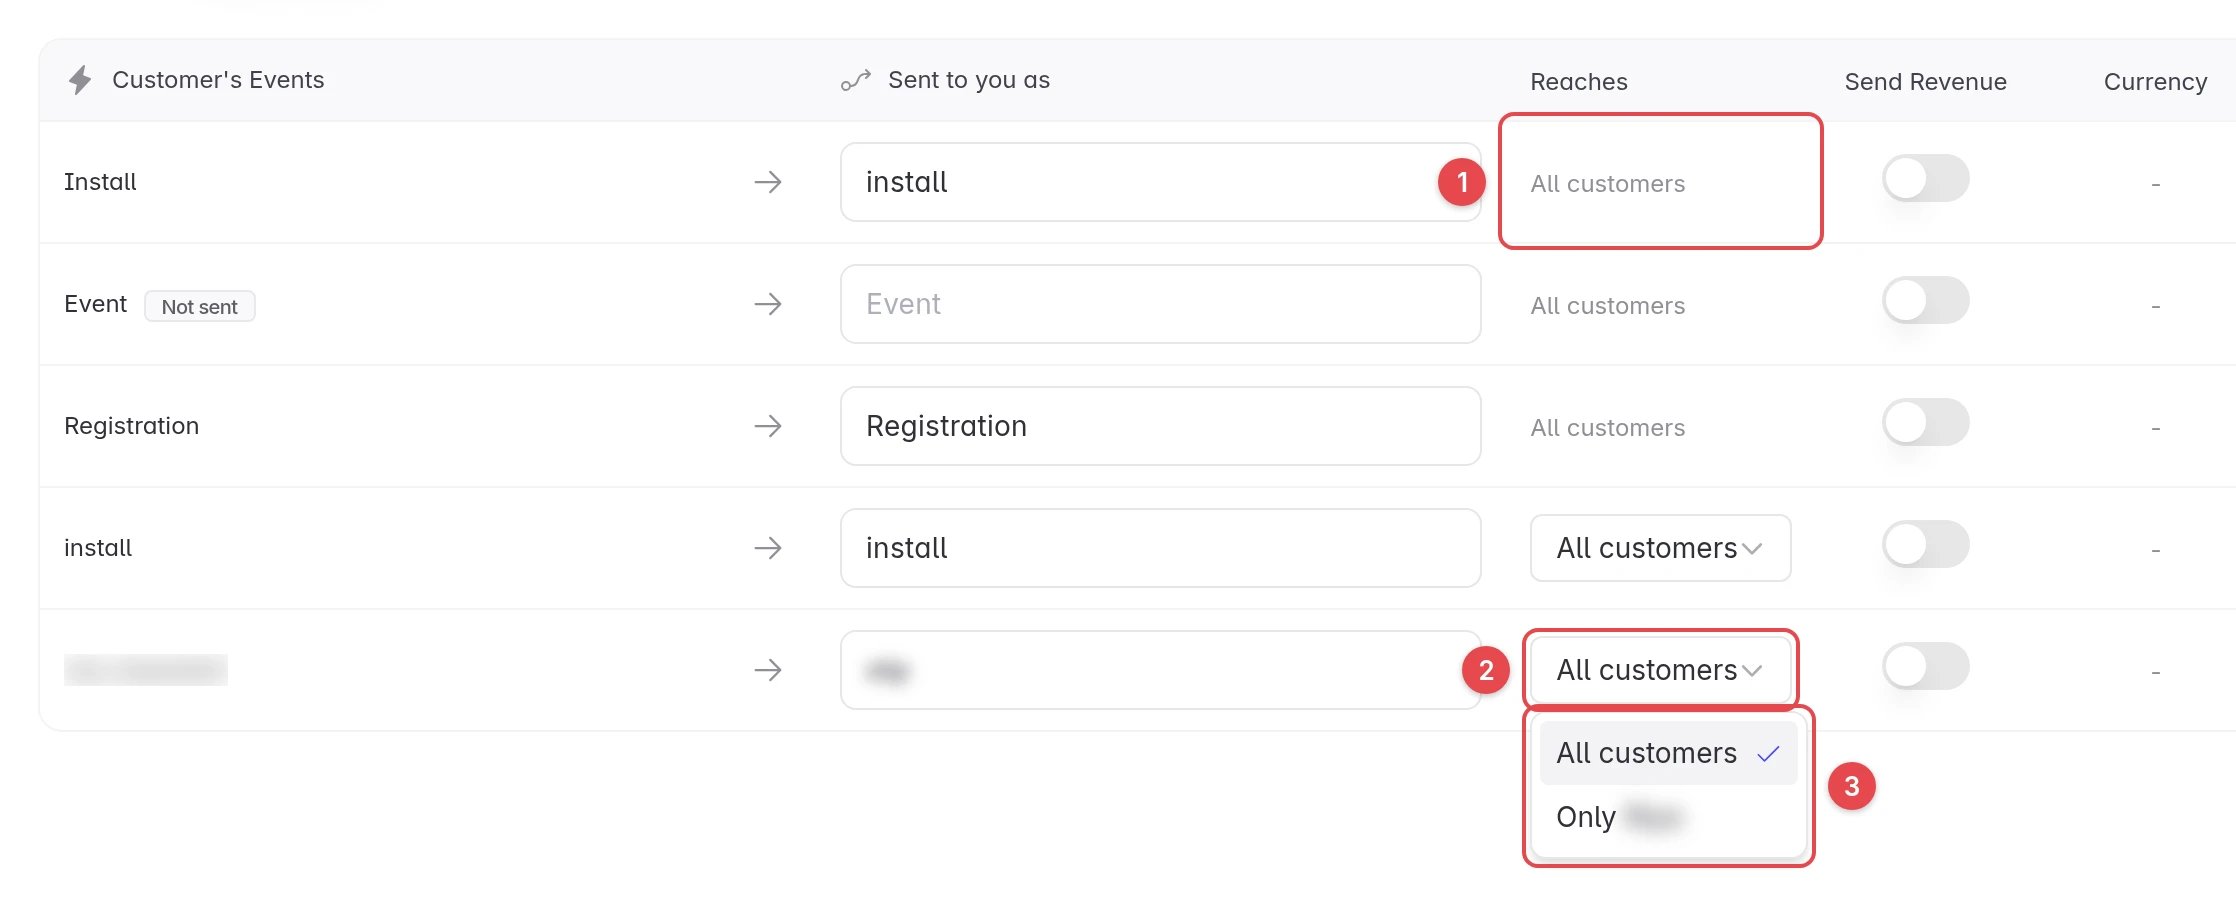 1. Your standing rows (`Install`, `Event`, `Registration`) show plain text instead of a dropdown. They apply to all customers and cannot be narrowed.
2. Named mappings have a dropdown. Click it to change the rule's reach.
3. Two options: **All customers** and **Only \**.
| Option | What it means |
| ------------------------- | ----------------------------------------------------------------------------------------------------------- |
| **All customers** | The rule applies to every customer connected to you who sends an event with that name. This is the default. |
| **Only \** | The rule applies to the customer currently selected, and nobody else. |
### Which one to use
* Pick **All customers** when the event name means the same thing everywhere, for example `purchase` always being your `sale` goal. One rule then covers every customer you work with now and every customer added later.
* Pick **Only \** when this customer is the exception, for example when only they call their purchase event `checkout_done`, or when you want a different name for them.
A change saves as soon as you pick it. You can move a rule between the two at any time.
**Only \** is greyed out when that customer does not send the event. A rule scoped to a customer who never sends it would never fire, so the dashboard blocks it instead of letting you create a silent rule.
## Add a mapping
Click **Add Mapping**. A new row opens at the top of the table.
1. Your standing rows (`Install`, `Event`, `Registration`) show plain text instead of a dropdown. They apply to all customers and cannot be narrowed.
2. Named mappings have a dropdown. Click it to change the rule's reach.
3. Two options: **All customers** and **Only \**.
| Option | What it means |
| ------------------------- | ----------------------------------------------------------------------------------------------------------- |
| **All customers** | The rule applies to every customer connected to you who sends an event with that name. This is the default. |
| **Only \** | The rule applies to the customer currently selected, and nobody else. |
### Which one to use
* Pick **All customers** when the event name means the same thing everywhere, for example `purchase` always being your `sale` goal. One rule then covers every customer you work with now and every customer added later.
* Pick **Only \** when this customer is the exception, for example when only they call their purchase event `checkout_done`, or when you want a different name for them.
A change saves as soon as you pick it. You can move a rule between the two at any time.
**Only \** is greyed out when that customer does not send the event. A rule scoped to a customer who never sends it would never fire, so the dashboard blocks it instead of letting you create a silent rule.
## Add a mapping
Click **Add Mapping**. A new row opens at the top of the table.
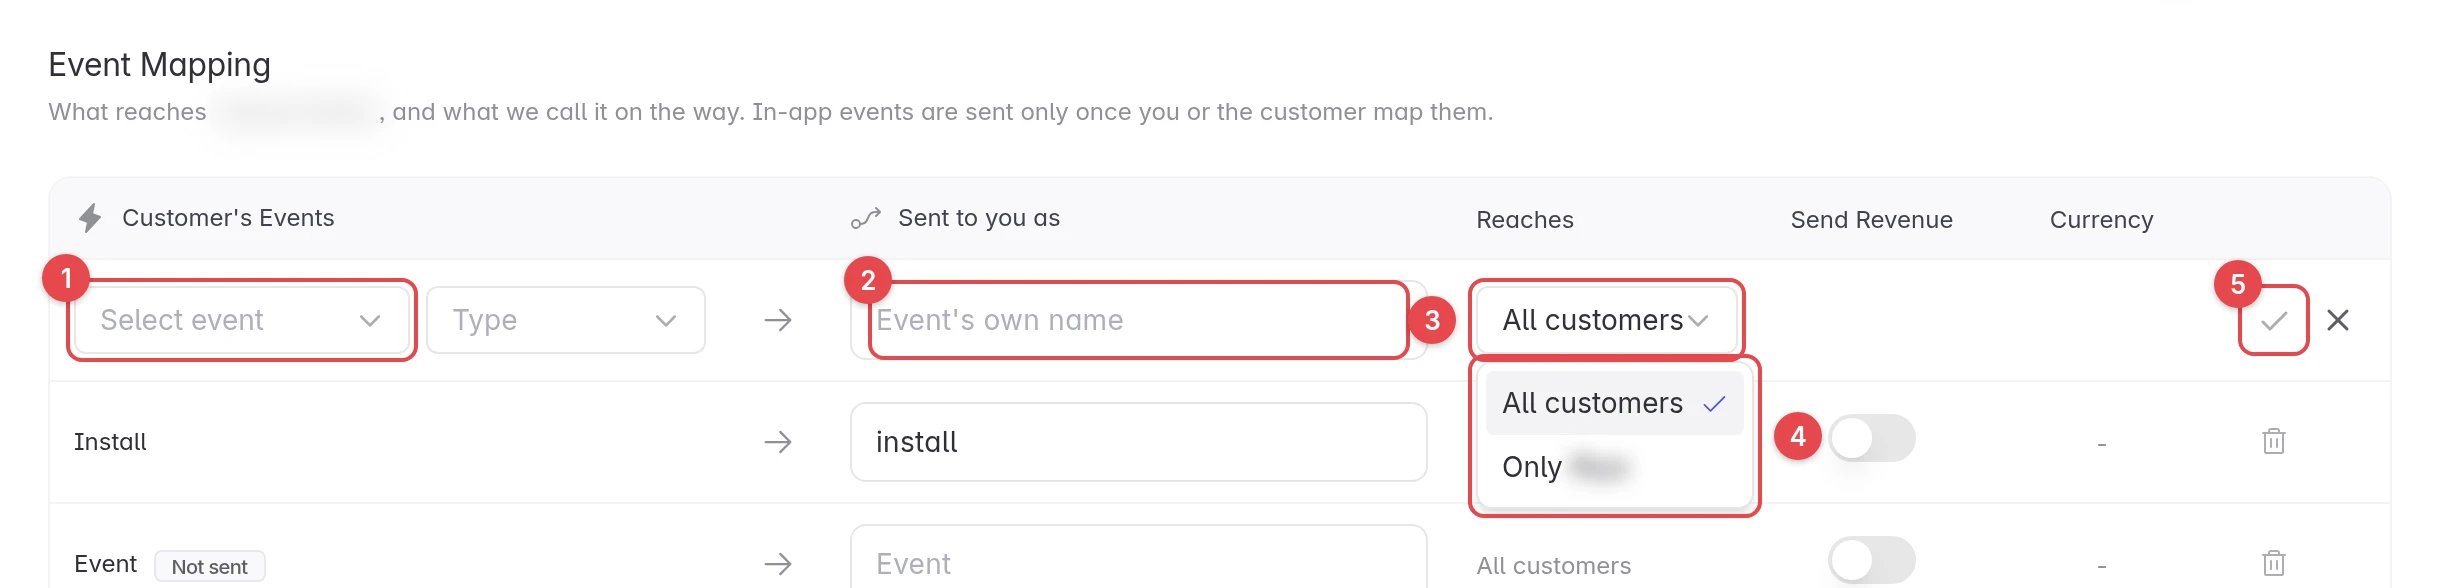 1. **Select event.** Pick the customer's event. When you have more than one postback type, pick the type next to it.
2. **Sent to you as.** The name you want to receive it under. Leave it blank to use the event's own name.
3. **Reaches.** Defaults to **All customers**. Change it here if the rule is for this customer only.
4. The same two options as on a saved row.
5. Click the tick to save, or the cross to cancel.
The event list depends on the reach you choose. **All customers** lists events across every customer connected to you. **Only \** lists only the events that customer sends.
## Remove a mapping
Click the bin icon at the end of a row.
* For an in-app event, removing the rule stops that event being sent to you.
* For an install or registration rule, the event falls back to your standing row.
* Standing rows cannot be removed. Their bin icon is disabled.
## Troubleshooting
In-app events are sent only when they are mapped. Add a mapping for the event, or ask the customer to add one from their dashboard. Installs and registrations do not need a mapping.
Check the **Sent to you as** box on that row. Blank means the event's own name is used. Also check whether a second rule exists for the same event with a narrower reach, because a rule scoped to one customer wins over a rule for all customers.
That customer does not send the event you picked. Either keep the rule on **All customers**, or ask the customer to confirm the event name they send.
The page needs a customer selected. If no customer is connected to you yet, there is nothing to map. Contact Linkrunner support to get connected.
Turn on **Send Revenue** for that row. If the switch is locked on, the customer classifies the event as a payment, and the amount is always included.
## Next steps
Check whether a conversion reached your endpoint.
The macros Linkrunner fills into your postback URLs.
**Need help?** Contact [support@linkrunner.io](mailto:support@linkrunner.io)
1. **Select event.** Pick the customer's event. When you have more than one postback type, pick the type next to it.
2. **Sent to you as.** The name you want to receive it under. Leave it blank to use the event's own name.
3. **Reaches.** Defaults to **All customers**. Change it here if the rule is for this customer only.
4. The same two options as on a saved row.
5. Click the tick to save, or the cross to cancel.
The event list depends on the reach you choose. **All customers** lists events across every customer connected to you. **Only \** lists only the events that customer sends.
## Remove a mapping
Click the bin icon at the end of a row.
* For an in-app event, removing the rule stops that event being sent to you.
* For an install or registration rule, the event falls back to your standing row.
* Standing rows cannot be removed. Their bin icon is disabled.
## Troubleshooting
In-app events are sent only when they are mapped. Add a mapping for the event, or ask the customer to add one from their dashboard. Installs and registrations do not need a mapping.
Check the **Sent to you as** box on that row. Blank means the event's own name is used. Also check whether a second rule exists for the same event with a narrower reach, because a rule scoped to one customer wins over a rule for all customers.
That customer does not send the event you picked. Either keep the rule on **All customers**, or ask the customer to confirm the event name they send.
The page needs a customer selected. If no customer is connected to you yet, there is nothing to map. Contact Linkrunner support to get connected.
Turn on **Send Revenue** for that row. If the switch is locked on, the customer classifies the event as a payment, and the amount is always included.
## Next steps
Check whether a conversion reached your endpoint.
The macros Linkrunner fills into your postback URLs.
**Need help?** Contact [support@linkrunner.io](mailto:support@linkrunner.io)